Posts

In part 3 of Behind the Gear at The Record Shop, we take a look at the Tube-Tech CL1B Opto Compressor; a device that has become a studio standard since its release in 1987. The CL1B was developed by Tube-Tech founder, John Peterson. John began his career as a maintenance engineer at the Danish Broadcasting Company. Educated as an electrical engineer, he could usually be found refurbishing gear in his spare time. In the early 80’s his interests turned to tube driven devices such as the Pultec EQ and the Teletronix LA2A. As was the case with many of today’s audio manufactures, John witnessed the growing market for vintage equipment as the quality of modern products was, believed by many, to be declining. He began designing his own renditions of classic equipment, and the rest is history. Tube Tech is now a mainstay in the world of audio, and they continue to produce superior quality tube equipment that has been utilized by everyone from The Rolling Stones to T-Pain.

The design of the CL1B was modeled after the Teletronix LA2A, a classic tube limiter that has been a standard in recording studios since its release in 1965.  John set out to build a device that offered the warm, musical compression of the LA2a Limiter, but with the added features of a compressor. The LA2a has only two controls, Gain and Peak Reduction. The attack and release times are fixed.  The CL1B features a fixed attack and release mode, but also provides additional ratio, threshold, attack, and release knobs. This allows us greater flexibility to achieve the perfect settings for a variety of applications. The Cl1B has another unique setting called Fixed/Manual Mode. This setting has a fixed, fast attack and variable release. You would think that this compressor would come with a two week class to learn how to utilize all of these options. However, the operation is fairly simple and always produces great results.

We lean on this compressor mainly for Vocals and Bass. On vocals we often use the CL1B, in conjunction with an 1176 or Distressor, to add a smooth, warm compression that helps the voice find its space in the track. In the bass world, the CL1B is great at taming the tone, but if you’re going for punch, we lean on some of our other options such as the 1176. From time to time, we will throw a snare or kick through the blue monster to give it some extra warmth as well.

One trick that we have found to be pretty exciting on vocals, is an extreme compression setting that can result in some pretty wicked tube saturation. We start by setting the attack all the way to the left, with a medium release and 10:1 ratio. Next we increase the threshold to hit -10 or so DB of gain reduction; tweaking the ratio and release to taste until the vocal starts to drive. The result is an analog tape like compression that can be perfect for a rocking vocal.

Thanks for dropping by! Check back next week for our next installment of “Behind The Gear at The Record Shop”, where we take a look at a throw back to Abbey Road, the Chandler TG1 Limiter. In the meantime, feel free to drop by our Gear Page for more information on our vast array of equipment.

As always, we love to hear feedback on our articles. If this was helpful, or a complete waste of your time, let us know! We love making new friends as well. Feel free to drop by our page on Facebook and sign up for our monthly newsletter to receive valuable resources and updates on the studio. Thanks for dropping by For The Record. Catch you next week!

-Giovanni

Therecordshopnashville.com

Michael Ide, from itproportal.com ,  says that “new reports suggest that Apple may soon replace low bit-rate music tracks with upgraded, higher quality ones. This move could likely be the result of Apple’s licensing agreement with the leading record labels in the music industry. Earlier, Business Week reported that the agreement between the two sides was now on the verge of being finalised, and also that upon being fully implemented it will allow Apple to go through a user’s entire iTunes collection and mirror it”…. read entire article here

While I am in full support of Apple making the effort to maintain the sonic quality that we as Producers spend so much time perfecting, I wonder if the average consumer would go for the idea. In the eyes of the mass consumer, is a high fidelity recording worth the extra space it will take up on hard drives and Ipods? Let us know your thoughts!

Barry has teamed up with For The Record to share his reviews with the latest in recording products. Barry is a recording engineer/producer and contributing editor for MIX Magazine, ‘New Toys’ columnist for L.A.’s Music Connection Magazine, and writer for www.prosoundweb.com. He also is editor/writer of Gear Lust, his online special review section at www.barryrudolph.com

I installed the 2009 version of Smith Micro’s Stuffit Utility into my G5 MAC and discovered Drop Stuff, the whole compression side of the seemingly lowly free utility we all used called Stuffit Expander. Drop Stuff is better than ever with a new interface and built-in AES 256-bit encryption.

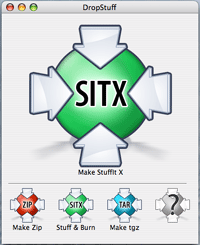
First of all with Drop Stuff, with its patented 24-bit image compression, has TIFF, PNG, GIF, and BMP compressors and you can compress files by to 98% of their original size (depending what they are). Squash and optimize MP3s, PDFs and images to save hard drive space and time when sending them over the Internet. Even JPEG photo files (an already compressed format) can be reduced up to a further 30%. Drop Stuff creates Stuffit, Zip and TAR archives–you just drop your files and folders on the appropriate icon on the super simple GUI. I liked the Stuff & Burn mode where it stuffs and sends the file to the MAC’s CD/DVD burner in one operation. Sweet!Smith Micro Stuffit Deluxe 2009

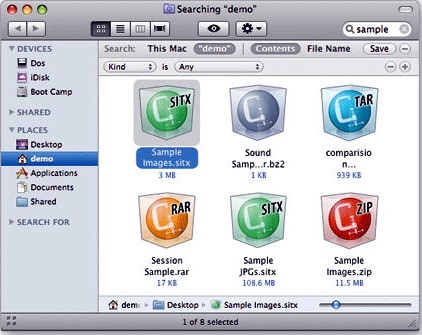
Expander now expands 7-Zip archives and segmented Zip archives along with files using any of 30 different compression formats–even encrypted Zip archives. I like browsing my archive of files without waiting for expansion using the Stuffit Archive Manager. You can preview thumbnails, add, delete and change files and save searches with Stuffit Collections.

Other cool features you get are: upload directly to FTP, MobileMe, iDisk or multiple CDs or DVD-ROMS, and restore files to original locations Stuffit is Finder-aware so you can preview compressed archives inside MAC’s TimeMachine.Smith Micro Stuffit Deluxe 2009

Using Stuffit Deluxe 2009 for MACs is like doubling the size of your hard drive for storing pictures and music. You can put off buying another drive and the work transferring files by buying it for $79.99 as a download from: my.smithmicro.com/mac/stuffit/index.html

One of the most exciting aspects of my job is having the opportunity to do something new everyday. Running a recording studio in Nashville, I have been privileged to work on an eclectic range of projects. While every record requires a unique approach, detailed preparation is consistently a key element of the process. This week, we take a look at the basic elements of effective pre-production.

Demos: Keep it simple

There is a common saying in the music industry that you can tell you have a great song when you can strip it down to the most basic elements and it still resonates with the listener. Recording a basic demo, or “work tape,” is an important step in choosing the right songs and preparing for the studio. 

Many songs can be effectively demoed with a guitar/vocal or piano/vocal arrangement. For bands, recording a rehearsal is a great way to capture the raw vibe of the tunes. When recording your initial demos, remember to keep it simple.  The “vision” of the material will often evolve during pre-production. You may also find that some revisions are necessary, in order to maintain cohesiveness within the record. A basic demo will provide you, and the producer, with a fresh canvas to outline the direction of the project. 

If you plan on performing to a metronome (click) in the studio, it is wise to record your demo with one as well. Not only is it good practice, but once you begin your demo recording, it is important to lock in the “feel” of the song by finding the right tempo. Once you complete the demo process, the next step is to define your sound.

Define your sound: Choosing your colors

Throughout the process of writing your material, working out arrangements, and recording your basic demos, you have already begun to develop the vision for your songs. In order to define the overall vibe of your record, you’ll want to begin an in-depth analysis of your tunes and outline the basic elements of your sound.   

You can start by defining the “sonic character” of your record. I refer to this as the combination of instrumentation, tone, space, depth, and vibe. For example, if you are recording a rock project you may want a heavy drum sound, wide guitars, in your face vocals, and a “live feel.” A pop-country ballad might call for clean drums, warm guitars, and smooth vocals. Every genre has its basic elements. Developing your spin on the style is an essential aspect of pre-production. However, it can be helpful to analyze recordings that influence your music. Try to use recordings that directly relate to the sound and vibe that you’re after. These “reference tracks” will be an excellent starting point for your production and arrangement. 

The next step is choosing the instrumentation. Listen through your demos and make a list of the instruments required for each song. It will be helpful to make notes of the desired “tone” for each element as well. 

You will also want to begin working out the arrangement. You may find that dropping out, or adding, a section will improve the flow of the song. Where the instruments are introduced, or cut, out can also make a big difference in the dynamics of the arrangement. If you are after a “commercial” production, you may need to revise your arrangement to follow the basic structure of the genre. It is important to maintain your artistic integrity, but there are times where a little compromise can make a song more commercially viable. In most cases, finding a good balance between following the format and maintaining originality is the way to go.

As you outline the elements for each song, it is important to keep the “big picture” in mind. While we live in a time where the single is king, cohesiveness between your songs plays a big part in defining your sound and making a great record. 

Rehearsal: Get it right before you go red

Great recordings come from great performances. One of the keys to an exceptional record is capturing the moment where the emotion is flowing and everything comes together just right. There is nothing that kills the excitement of recording more than trying to figure out the right part in the middle of a session. Taking the time to work out the songs, before your step in the studio, will allow you to focus your energy on the vibe of the recording.

If you plan on recording to a click, it is important to rehearse with one as well. Since you played to a click on your initial demos, it will be easier to incorporate this into rehearsal. It helps to send the click to a pair of headphones for the drummer, as well as running it through the PA. If possible, try recording your rehearsals for reference.

Start by playing through the songs until everyone is comfortable with the tempo and their parts. Once you have the performance down, you can listen back to your recordings and see if there are any revisions that could be benefitial to the arrangement. Don’t be scared to experiment with additional parts, breakdowns, etc. 

Once you’ve got the performances down, take some time to try out different tones to see what works best for each song. A different instrument, amp, or drums can add some flavor to the various tunes. This will also save you time when your dialing in the sounds in the studio.

Now that you have everything locked in, make note of your tones and record the final rehearsal. It will be helpful to listen to these tracks during the time leading up to your recording. This can also be a great reference during your sessions. If you are bringing in any sessions players for the record, be sure to give them a copy of your final demos so they can get to know the songs.

Effective pre-production takes plenty of time and patience. However, if you take the time to get it right before the light goes red, your record will thank you.

I hope this article provided you with the information you need to get started with pre-production. We would love to hear your questions, comments, and feedback! If we can be of any assistance, feel free to drop us a line!

Giovanni-

therecordshop1 (@) gmail.com