Posts

Luke James from JustLetMeSing.com

Charlotte, NC (PRWEB) April 11, 2011

Luke James from Bowling Green, OH has been named the winner of JustLetMeSing.com’s worldwide singing contest. To win, Luke beat out over 600 other contestants and made it through nine rounds of elimination singing a variety of cover songs and originals. The contestant search began in July 2010 and garnered entries from 48 U.S. states and 45 countries. Contestants uploaded videos and the public was invited to vote for their favorites at JustLetMeSing.com.

Luke received 154,000 votes to edge out the bluesy runner up, Anna McReynolds from Nashville, TN. The competition also had a parody category which was won by Tim Baggett of Newport News, VA. His finale video was a comical take on Billy Joel’s “We Didn’t Start the Fire” called “We Didn’t Read the Label”.

While he was never into music while growing up, Luke finally picked up a guitar at age 18 and hasn’t stopped since. In 2009 and 2010 he made it to the Hollywood round of American Idol. After just missing the top 24 both times Luke decided to pursue a career in music and has been performing shows across the country.

Luke created his own videos, each with its own artistic flair. One of his more popular videos featured him singing Gnarls Barkley’s “Crazy” with over 30 wardrobe changes during the four minute song. Another is his original “We Fall” which showcases him playing guitar with broken strings in a suit and tennis shoes under a tree in the middle of winter.

As the winner, Luke receives the opportunity to record his own single at The Record Shop in Nashville, TN. He will also be performing on Balcony TV Nashville which is shot at The Hard Rock Café. Luke also receives a Virtual Radio Tour valued at $5,000, which exposes his music to radio stations across the country.

Season two of Just Let Me Sing will feature microsites hosted by local media partners in the U.S. and Canada. The site is integrated into Facebook and Twitter to increase the viral spread of the best videos. Anyone interested in becoming a microsite partner or contacting the artists please see below.

Contact Information:
Company: Just Let Me Sing, LLC
Web: https://www.JustLetMeSing.com

Sponsors:
CMC Promotions: https://www.CMCPromotions.com
The Record Shop: https://therecordshopnashville.com
Balcony TV: https://www.BalconyTV.com

Sue Basko, Lawyer for Music and Film, was kind enough to feature The Record Shop as part of her blog…

Sean Giovanni, Nashville Music Producer/ Balcony TV Nashville

by Sue Basko

The Record Shop is one of Nashville’s new creative, up-and-coming recording studios. Sean Giovanni is The Record Shop‘s owner/ music producer/ recording engineer.

Giovanni also runs Balcony TV NashvilleBalcony TV is an internet music show that brings in well-known musical acts to do one acoustic song apiece out on a balcony overlooking a scenic part of a city. Balcony TV was founded in 2006 in London and has since been franchised worldwide to Dublin, Hamburg, Poznan, Brighton, Auckland, Paris, Brisbane, Edmonton, Rennes, Prague, Toronto, and Mexico City. Nashville was the first U.S. city to have Balcony TV, and has been followed by New York and Austin. I love Balcony TV!

Sean Giovanni offers these insightful answers to my probing questions: Read The Full Interview Here……

Eric Normand, author of “The Nashville Musician’s Survival Guide” and accomplished guitarist, teamed up with “For The Record”, to provide some insight on climbing the ranks as a musician in the Nashville music industry. Eric’s upcoming book, “The Nashville Musician’s Survival Guide” provides a comprehensive reference of what it takes to persevere in the competitive Nashville music community.

You can learn more about Eric and his upcoming release at nashvillemusicianssurvivalmanual.com

Whether you are an obscure musician trying to get your music heard, a first-time author putting forth a new book, or an independent filmmaker introducing your first film, you all share something in common; a desire to introduce your art to a world that has yet to learn of it. How do you create an awareness of your project? These are tough times and the aforementioned endeavors are not easy ones. The list doesn’t stop there either. Photographers, artists, songwriters, and others are in the same boat.

The new global economy and a variety of other factors has created an extremely competitive dog eat dog world when it comes to business, and this means we all might have to take some alternative approaches to getting the word out. Without the proper publicity and promotion, no one will know about your great project, products or services. Traditional advertising is too expensive for most, and not necessarily that effective anymore. There is no right or wrong approach, but many believe that social media combined with Internet marketing are essential to most startup creative businesses at this point in time. If you’re ready to take the plunge, here’s how you can dive in.

  1. Build your social pool: Interact regularly on Facebook to slowly build a group of friends, fans, and followers on the Internet. With hundreds of millions of users, it shouldn’t be hard to find a couple hundred that are interested in you. Over time this can grow into thousands. Twittering can be productive as well.
  2. Start blogging: At this point in time, blogging is a powerful tool and can be used to promote literally any business. Create your own blog and write about your areas of expertise. The information you put forth should not only be directly or indirectly related to your products and services, it should also be useful to your targeted audience.
  3. Build a website: While a .com domain is optimum and will help to give your business a legitimate “face”, not everyone can afford one initially. There’s nothing wrong with starting out with a free WordPress (or similar) site. This will allow you to begin building your brand. Your blog should be built into this site or linked to it. This website/blog will serve as a central hub to all your Internet activity, with links to Facebook, Twitter, etc.
  4. Guest Blogging: It can take a while to create heavy traffic on your site. Blogging as a guest on a higher traffic site can help build your readership and drive more traffic to your site.
  5. Online Discussions: Find message boards with themes that relate to your project and interact with group discussions. Offer advice and perspective where pertinent and provide links to articles on your site.

There is a recent article regarding working in the new social media paradigm that offers some useful tip’s that I highly recommend reading – Top Seven Reasons Why Artists Strongly Resist Social Media by Ariel Hyatt.

The online social interaction approach to publicity is no secret, but it is still a new concept to many. Over time, if done correctly, you will build a “readership” that is genuinely interested in what you have to say, so always strive to provide useful information. By building a large group of readers, or “friends”, fans, and followers, you are connecting with an audience that will potentially come to your shows, buy your book, watch your film, and enjoy your art.

Is this easy to accomplish? No. Does this take time and effort? Absolutely, but then again so does any career. Without the proper promotion, nobody will ever hear about your project. If you think you have something good to offer the world, put it out there. Sometimes the best way to learn how to swim is to just dive in to the pool. You might sink and then again you might not, but you’ll never know if you don’t try.

Are you ready to take the plunge yet?


Barry Rudolph has teamed up with For The Record to share his reviews with the latest in recording products. Barry is a recording engineer/producer and contributing editor for MIX Magazine, ‘New Toys’ columnist for L.A.’s Music Connection Magazine, and writer for www.prosoundweb.com. He also is editor/writer of Gear Lust, his online special review section at www.barryrudolph.com

Ohm Force Ohmicide


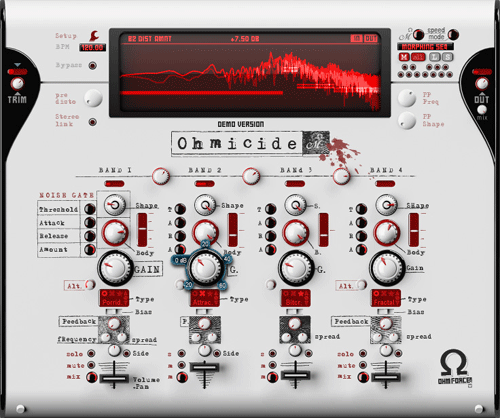
Ohmicide is from the French company Ohm Force’s Melohman family of plug-ins. Ohmicide is a distortion plug-in that is completely malleable in nearly every way possible. It starts by splitting audio into four frequency bands each with six different processing modules. The modules are: M/S matrix, noise gate, dynamics, distortion, make-up gain, pan, and it finishes with an acoustic feedback path. I liked the dynamics processor with its Shape control (a low-level compressor) and Body (basically it acts like an expander or limiter of sorts).

The Distortion processor module has three variants, Standard, Xxx, and Odd of 37 distortion algorithms making a total of 111 Types of distortion. A distortion Type is further adjustable using a Gain control, a DC offset control called Bias that simulates the erratic behavior of broken audio gear, and the Alt knob changes the underlying algorithm of the Type. The main graphic at the top of the plug’s GUI is an audio oscilloscope that shows: input, output, or both together superimposed and a second bar chart below shows where the filters of each frequency band begin and end. Somewhat useful and cool looking, you get an idea of what is going on but, as always, my ears tell me what’s really going on–complete audio mayhem!

My main use for Ohmicide is in mixing where I want to “rough” up certain tracks so they cut better or they take on a particular character and prominence. With a plug-in this deep and rich, I start with a preset to get close to what I’m looking for. For sound designers Ohmicide represents a major new tool for endless experimentation–you’ll never leave your studio!

The factory presets come in folders of twelve called MegaPatches and are selected via a MIDI keyboard or by clicking on the GUI. They are designed, tested and named for specific applications. Cool! They are: BassXxxxx for electric bass; DrumBassXxxxx is for Bass+Drum mixes; DrumXxxxx (my favorite!) is super for drum kits or loops; GuitAmpXxxxx sounds like the worst guitar amps ever made on fire; MiscXxxx are for general purpose grunge; and PercXxxx presets are for singular drum kit pieces like snares and kicks.Ohm Force

Available in RTAS, AU and VST formats for PC and Macs, Ohm Force Ohmicide:Melohman sells for about $125US and is now my “go to” filth box. I have many guitar amp simulators and other garbage makers but none as totally variable at Ohmicide or comes with as many great starting presets. Order up some dirt at: www.ohmforce.com


Eric Normand, author of “The Nashville Musician’s Survival Guide” and accomplished guitarist, teamed up with “For The Record”, to provide some insight on climbing the ranks as a musician in the Nashville music industry. Eric’s upcoming book, “The Nashville Musician’s Survival Guide” provides a comprehensive reference of what it takes to persevere in the competitive Nashville music community.

You can learn more about Eric and his upcoming release at nashvillemusicianssurvivalmanual.com
So you just moved to Nashville, you’re a good solid player with a good attitude and excited to begin working. You don’t care about being a superstar, you just want to play music with others but you are quickly learning that this can be hard to do. You are having a hard time getting off the ground. What do you have to do to get started in this town?

Regardless of your talent level, the truth is simply that talent alone isn’t going to get you work. Nashville, like any major music Metropolis, attracts talented people by the masses. They literally flock to this place in droves. This creates a supply and demand problem that works against the musicians. Knowing and understanding this is crucial. Ultimately, the only way in is by slowly nurturing relationships that will lead to opportunities. The best place to build these relationships is in the nightclubs around town. There is no shortcut to this, it’s going to take some time so be patient.

A newcomer to Nashville recently told me his story. He moved to Nashville about a year ago with the goal of becoming a part of the country music scene here. He has been frequenting the clubs downtown with the intention of sitting in and getting to know some of the players. Even though he’s familiar with most of the standards that are being played, he’s having a hard time getting past the idea of hustling to sit in. He said that he views his reasons for networking as self-serving, and this prevents him from talking to musicians because he feels self-conscious about it – like he’s using them. The end result is that he just walks around watching bands, never talks to anybody, and then goes home.

I, as well as many others, can relate. When I first moved to Nashville I was in a similar situation. How does one introduce them self to all these total strangers and maneuver his or her way into sitting in without coming off to self-serving?

One thing that worked for me was seeking out groups of players and artists that I related to musically. This makes it much easier to form real relationships that can evolve over time. Try to find a group of players, or singer that you really connect with. Maybe you really dig their song list, or are inspired by the performances of one or more of the players in the band. If you can feel a real connection through the music, it should be easy to engage in some genuine conversations – the music is your common ground. Find out when they’re playing again and become a regular. Over time they’ll gradually get to know you and sitting in will be part of a natural progression. Maybe try to cultivate a handful of different situations like this. Also, try to find these kinds of inspiring groups that are playing either earlier shifts and/or at the less popular bars. Those situations will be more laid back and might make it more likely for them to take breaks. And that combined with a smaller crowd in general will make it easier to engage in conversation.

The key to gigging in Nashville is relationships. It’s hard to force friendships and relationships to happen, they need to naturally evolve. You need to regularly put yourself in different kinds of situations where this can happen. It just takes time, persistence, and patience. Most importantly, be a good person. Of course being proficient on your axe will help to.

There is no guarantee that this approach will allow you to achieve the kind of success you envision. But for that matter, there are no guarantees in the music business, or life in general. So just suck it up, be in it for the long haul, and get out there and start pounding the pavement. Be friendly and outgoing and put your best foot forward. Talk to people. Take an interest in their careers and lives. Try to find some common ground and build relationships with players that you relate to. If you have already tried this and haven’t yielded much results, try harder.

That’s what it takes to get started in Nashville.

Eric Conn of Independent Mastering drops by For The Record to share some insight on preparing for mastering. Eric has mastered records for a variety of artists. From Willie Nelson, Garth Brooks, and John Prine, to Skid Row, Hank III, and Young Buck. Here at The Record Shop, Independent Mastering is our first choice to put the final touches on our records.

You can learn more about their work at Independentmastering.com 

1. Sequence Your Album

Preparing an album sequence before mastering is a must. You can play with the order in iTunes or in your DAW, then make a CD and take a listen! How does it flow? Anything jarring? Does the sequence take you on a journey or tell a story?

2. ISRC CODE

Many radio stations track music via an ISRC Code (https://en.wikipedia.org/wiki/International_Standard_Recording_Code), and digital distribution company’s use this code to track purchases.  Check with your digital distribution company—they may assign a code to you, or you can purchase your own code. The ISRC Code can be imbedded in the TOC at mastering, or you can have it done later. The benefit to having it done at the time of mastering is that the code will be on your manufactured discs.

3. CD-TEXT

Do you want CD-TEXT on your disc? CD-TEXT allows your recording to be identified on some (but not all) CD players.  If you do, please type out: Artist, Album Title, and Name of Songs. Better yet, email it to the mastering house so they have it the way you want it before you arrive!

4. MEDIA

Labeling your mix media is a must, especially if your not attending the mastering session. Artist(s), song titles, sample rate and bit depth are a must when using digital media. Analog media needs reference tones and phase clicks, and leader tape in between the cuts. Other details should include: contact information for the artist, producer, and engineer, with both a phone number and email address. A sharpie with the artist’s name scribbled on the DVD does not count as labeling your media. If you want to be considered a professional, label your mixes. Hand a professional mastering engineer a CD/DVD/Tape with nothing written on it and even if he doesn’t say anything about it, he’s thinking “amateur”.

5. DECISIONS!

Do you like your mixes? Have you made decisions regarding alternate versions of the mixes? Vocal up? Vocal down? TV-Tracks? Instrumental-Tracks? Radio Edits? Being satisfied with your mix is the number one key to having a successful day at mastering. Coming in with all the versions you need to have EQ’d will save you time and money.

6. ATTENDANCE

Are you familiar with the mastering room? If not, bring a reference disc! The reference disc can be anything, but it should be something you are familiar with, something you like. Take 5 or 10 minutes to listen to your reference material in the mastering room before you start making critical EQ decisions in a room you might not be familiar with. Trust the mastering engineer. He / she works in the room every day and knows it. If you’re feeling unsure, take the time to make a reference disc of one or two songs that you can listen to in your car (or other system) before you go down the wrong path in a room you don’t know.

7. Getting What You Want

Sometimes you might not get what you want the first time around. Sometimes you will. Make sure you have a realistic attitude towards mastering and know the limitations of the craft by talking about it with the engineer. Miracles can and do happen in mastering! Or, it may be that you need to remix something. Communicate your needs!

8. Compression on the Mix Buss vs. Compression at Mastering

Get what you want out of your mix buss first. If you like it there, you’ll like it after mastering. If you’re pumping up your mix for your client via a digital limiter to make it “louder”, make sure your mastering engineer knows!

9. Your reference media VS. The mastering reference media

What have you been listening to? Did you mix to tape but all your reference versions have been digital copies bounced to disk? If that’s the case, you have no idea what your mix sounds like. Make your reference versions reflective of your mix media. Then bring the mastering house what you’ve been listening to.

10. Don’t be swayed by price.

Cheaper isn’t always better. Joe Blow in the bedroom charging you $50 bucks an hour after he gets home from his day job is a hobbyist at best. Twenty-seven hours later you’ll have spent $1350 and you might not be any closer to getting what you want than you were at the first hour. Use a professional, in a real studio, with real tools. In 3-5 hours you’ll get what you want and have the peace of mind that the master will be right. Good, Cheap, Quick: pick two.

Coming in prepared will save you money, and your project will go much smoother! These are some of the questions I like to ask my clients, and your mastering engineer may have more or less questions! If you take the time to communicate your needs and the desired outcomes you would like to achieve from the session, you will be much happier with your final master. Your mastering engineer will be happier too!

-Eric Conn (Independent Mastering) 

Barry has teamed up with For The Record to share his reviews with the latest in recording products. Barry is a recording engineer/producer and contributing editor for MIX Magazine, ‘New Toys’ columnist for L.A.’s Music Connection Magazine, and writer for www.prosoundweb.com. He also is editor/writer of Gear Lust, his online special review section at www.barryrudolph.com

SoundToys PanMan

PanMan is a rhythmic auto-panner plug-in with a groove control feature. In stereo mixing, changes in the basic nature of a vocal or instrument track are limited to the level or loudness of a track, its equalization/tone, whatever added effects (reverb, chorus, flanging delays etc), and it’s panoramic position–it’s placement across the stereo field as created by left and right placed loudspeakers.

PanMan addresses and allows full access to this important aspect of mixing with tools that offer new panning treatments that go way beyond the abilities of classic hardware analog panners such as PanScan or Spanner. PanMan will control the pan type, reaction time, pan position, and pan width–even beyond the physical position of your stereo speakers.

PanMan has six modes including two rhythm modes complete with a user-programmable rhythm editor and numerous parameters for precisely determining the way any mono or stereo track in your mix can “dance” across the speakers. Some of the panning actions possible are: ping-pong triggered panning and random triggered panning with user-definable trigger divider as found in the PanScan hardware unit; and LFO-style continuous panning with selectable pan shapes and precise dynamics control. After installing PanMan into my Pro Tools HD rig I was panning everything as if I was discovering stereo sound for the first time! I would suggest going through the big collection of presets and modifying one of them that is close to what you’re looking for.

I seemed to gravitate towards the Rhythm Step panning modes where you can designate multiple “hard” pan positions (up to five positions) that change in locked session tempo fashion. Leave it to SoundToys to also provide controls called Feel and Rhythm to further sync the panning action to the feel of the music. Borrowed from SoundToys’ Tremolator and FilterFreak is the Custom Rhythm Editor–actually two editors for two different panning approaches–break point editors for designing complex modulation waveforms. These are brilliant features!

I also liked using the LFO-based panners for more dreamy-sounding treatments. You have complete control over the LFO’s speed or rate and the direction of the pan movement: Left-to-Right, Back-and-Forth, and Right-to-Left. I used one of the wider panners for a reverb return I mixed with another instantiation of the same reverb patch. This animated the reverb “cake” I was cooking up for a big vocal harmony stack. The Tweak button opens a whole LFO dynamics GUI for setting up modulation of the rate, changing the pan offset (shifts the left and right panorama itself anywhere–leaning to the left or right), defining the panning width (Width Mod) and panning rate (Rate Mod) depending on the level. The Threshold, Attack, and Release knobs control the envelope detector that determines dynamics modulation.

I did find the triggered panning very accurate and foolproof for causing a track to reposition itself predicated on it exceeding a certain level as set with the Threshold control. I also like the Width control for setting how far or wide to the left and right a track pans–all the way beyond 180 degrees (hard left and right) to 210 degrees or outside of the speakers.

Auto panning has the potential to be a distraction for the listener and the Smoothing control will set the transition from position to position anywhere from an instant and super hard “snap” to much slower, lazier or liquid movement.

An unexpected feature in PanMan are the different Analog modes where you can change from the clean digital operating mode to any of seven different analog distortion characteristics whose amount is controlled by the Input and Output I/O knobs. Dirty up any panned track using: Clean, Fat, Squash, Dirt, Crunch, Shred, or the ridiculously sounding Pump characteristic models. These sound like they may have been borrowed from SoundToys’ FilterFreak and other SoundToys plug-ins.

As with most of the SoundToys plug-ins, the programming detail and feature sets go on and on and PanMan is no different in that regard. But I’m a beginner and I have had no problems getting beautifully ornate panning treatments very quickly. This is a sound designer’s dream tool that pays off more and more as I learn more about the internal tweak controls. Like Decapitator, PanMan is a big winner for me here at my Tones 4 $ Studios!!

There are demo versions posted at www.soundtoys.com. It sells as a single plug-in for $349 in TDM and $179 Native. The SoundToys TDM Effects Version 4 bundle sells for $1,195 and includes eleven plug-ins. Both Decapitator and PanMan are exclusive to V4 along with a new preset management system, and many new presets. The Version 4 upgrades cost $99 for Native and $199 for TDM. Check: www.soundtoys.com for more information.

Barry has teamed up with For The Record to share his reviews with the latest in recording products. Barry is a recording engineer/producer and contributing editor for MIX Magazine, ‘New Toys’ columnist for L.A.’s Music Connection Magazine, and writer for www.prosoundweb.com. He also is editor/writer of Gear Lust, his online special review section at www.barryrudolph.com

I installed the 2009 version of Smith Micro’s Stuffit Utility into my G5 MAC and discovered Drop Stuff, the whole compression side of the seemingly lowly free utility we all used called Stuffit Expander. Drop Stuff is better than ever with a new interface and built-in AES 256-bit encryption.

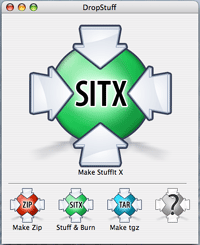
First of all with Drop Stuff, with its patented 24-bit image compression, has TIFF, PNG, GIF, and BMP compressors and you can compress files by to 98% of their original size (depending what they are). Squash and optimize MP3s, PDFs and images to save hard drive space and time when sending them over the Internet. Even JPEG photo files (an already compressed format) can be reduced up to a further 30%. Drop Stuff creates Stuffit, Zip and TAR archives–you just drop your files and folders on the appropriate icon on the super simple GUI. I liked the Stuff & Burn mode where it stuffs and sends the file to the MAC’s CD/DVD burner in one operation. Sweet!Smith Micro Stuffit Deluxe 2009

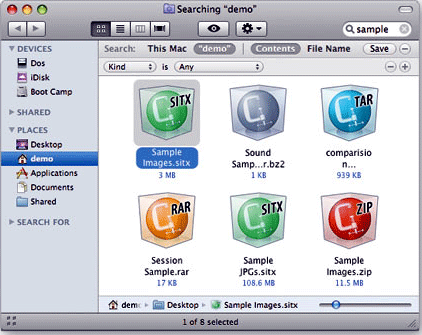
Expander now expands 7-Zip archives and segmented Zip archives along with files using any of 30 different compression formats–even encrypted Zip archives. I like browsing my archive of files without waiting for expansion using the Stuffit Archive Manager. You can preview thumbnails, add, delete and change files and save searches with Stuffit Collections.

Other cool features you get are: upload directly to FTP, MobileMe, iDisk or multiple CDs or DVD-ROMS, and restore files to original locations Stuffit is Finder-aware so you can preview compressed archives inside MAC’s TimeMachine.Smith Micro Stuffit Deluxe 2009

Using Stuffit Deluxe 2009 for MACs is like doubling the size of your hard drive for storing pictures and music. You can put off buying another drive and the work transferring files by buying it for $79.99 as a download from: my.smithmicro.com/mac/stuffit/index.html

Barry has teamed up with For The Record to share his reviews with the latest in recording products. Barry is a recording engineer/producer and contributing editor for MIX Magazine, ‘New Toys’ columnist for L.A.’s Music Connection Magazine, and writer for www.prosoundweb.com. He also is editor/writer of Gear Lust, his online special review section at www.barryrudolph.com

The two-rack space Crane Song Egret is an eight-channel summing/mixer specifically designed for both straight ahead DAW mixing and composite mixing where both virtual instrument or other audio sources are mixed together with DAW audio tracks. To accomplish this, there is a lot of impeccably built technology packed behind the beak of this bird!

The ultimate aim for an audio equipment designer is purity of sound and to that end Egret works transparently–a pure system that adds no gain or ‘coloration’ to the overall sound. However to satisfy music producers/mixers who depend on their equipment for a certain “je ne sais quoi” quality, Egret also has a Color control knob for each of the eight inputs. It adds (or subtracts–depending on your perception) a certain analog softness to edgy audio sources.

Read Barry’s Mix Magazine Feature Article Called “Strictly Summing.”

Egret uses eight D/A converters just like those used in Crane Song’s Avocet mastering monitor controller. Supporting rates up to 192kHz, a Cirrus Logic 4398 D/A chip is used along with an 8421 SRC chip (sample rate converter used for input jitter reduction) surrounded by Analog Devices OP275 amplifiers for interfacing to the unit’s discrete Class-A summing and mixing bus circuitry.

There is a front panel switch to disable the SRC for cases where lower latency is required and the Source switch chooses the unit’s digital source between three inputs: AES/EBU (4) XLRS, ADAT Lightpipe, and a third ‘yet to be determined’. Currently the converters and the interface supports AES single wire to 192KHz, ADAT, and S/MUX to 96kHz and can be upgraded as the technology changes. The converters will also independently operate even at different sample rates if required.

Features And Front Panel

Each channel of Egret has a level control, a cue send, and pan control. Each channel also has an analog/digital source button where either the output of the eight-channel analog-to-digital converter or an alternate (eight rear panel TRS jacks) analog balanced line input can be selected. The alternate Analog Inputs could be used for virtual instruments running along with the mix or live sound sources such as in a DJ or FOH mixing application. You could also use them as returns from external processing gear.

To add external processing to any channel in Egret you would send to outboard gear from the direct out (eight rear panel XLRs) and return its output to the analog input. By switching between the digital (actually the output of the D/A converter) and Analog In you could A/B the inserted processing.

There are both solo-in-place and mute buttons on each channel’s line up and a built in Aux send bus with Master level control that works for either a cue system or as an effect send. The headphone monitor jack’s output follows the stereo bus output for a monitor mix when Egret is being used in multi-channel location recording.

Also borrowed from the Avocet’s design is the master bus level control. It’s a Grayhill rotary shaft encoder that drives a microprocessor-controlled bank of relays for super-accurate and repeatable 1dB stepped attenuation. An absolute necessity for recalling mixes, the stereo gain matching is better than 0.05dB.

Egret is built so that the stereo, and cue buses can be chained together to create a many input system. With a special cable, Egret’Äôs bus can be tied to a Crane Song Spider to sum additional analog inputs for complete DAW recording and mixing/interface system.

The Egret Flies

My first test was to reassign the outputs of an “in the box” Pro Tools mix I had already done. I reassigned it into four stereo stems. I wanted to keep my mix the same and compare my stereo mix with the Egret’s analog sum of the stems. I configured Pro Tools’ I/O to send ADAT Lightpipe digital audio out the 9 through 16 ADAT spigot of my Digidesign HD192 interface unit. I set up drums and bass to outputs 9-10, guitars to 11-12, keyboards to 13-14, and vocals plus all effect returns on 15-16. All four Pro Tools stereo master output faders were at 0dB positions (unity).

I ran all eight Egret channel level controls at full CW, appropriately pan odd/even channels let and right, and the Master level at one LED dot below 10. Again like my Avocet volume control knob there are green LEDs ringing the stereo level control to show levels in 1dB steps.

The stereo LED meter on the Egret shows peaks levels at about 2/3 of full scale–obviously Egret has tremendous dynamic range with substantial headroom to spare. I connected my Benchmark Media ADC-1 to convert the Egret mix to digital and sent an AES/EBU signal back to a new stereo mix track in Pro Tools via the AES Enclosure input. Also everything was clocked from the ADC-1.

Since I wanted to check for any differences between my ITB mix summed inside of PT with the Egret’s analog summing, I had to place the same stereo plug-in processing chain on the Egret summed mix back in PT.

The result was both mixes matched closer than I would ever imagine. So does this prove anything? Considering I’m doing two extra conversions: the D/A in the Egret and then the A/D in the Benchmark and applying the same stereo processing, I was surprise that the Egret was this transparent and that the eight channel inputs tracked each stem’s level so exactly. It is a testament to the quality and design of Egret, the quality of the converters used and lastly the accuracy of Pro Tools HD Accel.

So why go through this setup if it ends up sounding about the same? The answer is that you gain more mix control valuable when mastering or supplying stemmed mixes in post-production jobs.

Separate processing of mix stems goes back to George Martin and the Beatles when he would mix their mono singles to a ‘twin track’ (2-track) tape deck with vocals on one channel and the track on the other. In mastering he would compress and EQ the vocals and track differently and recombine them for maximum punch and loudness.

I Go Deeper

So my next test was to apply the same stereo bus processing I put on the entire stereo mix separately to each of the four stems. For this song I had: WAVES’ SSL Stereo Bus compressor followed by the Sonnox Stereo Limiter and followed that with Sonalksis’ SV-517 Stereo EQ. Of course in a big and powerful Pro Tools rig (like mine) this is all easy to do–no need to buy three more hardware stereo EQs, limiters, and compressors you’d need if we were working in Abbey Road studios circa 1965!

I put those plugs all set the same across each of the four stereo stem masters. Immediately the Egret’s stereo master had to come down 5dB with the increased average level jump of each of the stems. The mix was all wrong necessitating new vocal rides, drum sound changes and everything else.

For this to work I would have to start a new mix using this stem configuration. After a little work starting a new mix, I could hear that the vocals took on more clarity especially after readjusting EQ and compression and doing new gain rides. I tried compressing the drums and bass more without affecting the rest of the song’s instruments and vocals. Since my stem masters in PT are automatable, there are loads of creative opportunities with regard to remixing tricks and general mayhem.

I also had a chance to see what the Egret’s Color controls did. It is a very subtle effect most noticeable on electric guitars. It mellows out any abrasiveness in the sound without a big shift in loudness. Applied to all the stems, it is another sonic choice you cannot get in any other way I know of.

I’ll Take Four Please!

So my only wish is for at least four Egrets interconnected for 32 mix channels. I’d set them all the same at unity and all odd/even, left right for standardized recall. Like my Crane Song Avocet and Phoenix TDM plug-ins, the Egret is a big winner for me. All pro all the way, it is one of the most flexible, great-sounding summing/mixing systems I’ve used so far’Äîand I’ve tried a lot of them! It sells for $5,600 and for much more go to: www.cranesong.com/downloads/egret%20data.pdf

The music business….what can be said that hasn’t been repeated over and over and over again. Let’s skip all the details we’ve been whining about these last few years, and get down to it.  Basically, there’s not much room at the top these days. I often wonder, with great uncertainty, if there will ever be another Beatles, Madonna, Michael Jackson, or any of the “superstars” of past generations. Is it just vintage nostalgia that everyone’s favorite rock band is still Zeppelin, or have we reached a point where the focus on “commercial appeal” has resulted in a mass audience that has the attention span of my dog? (shout out to Jops!)

I don’t think anyone has the ultimate answer. (If you think you do, leave us a comment!). However, there is one thing that we can all agree on. Music is a product. In order for a business (the artist) to sell their product, they must market it effectively. Viral marketing is an essential aspect of a comprehensive marketing plan for artists. This week we lay out 5 steps to effective internet marketing for musicians.

Before you can develop an effective viral marketing campaign, it is important to understand the importance of offering quality content. In their book, Inbound Marketing, advertising guru’s Brian Halligan and Dharmesh Shah, call this process “creating remarkable content.” The idea is that viral marketing is far more effective when the business develops an original strategy that is “remarkable” enough for the consumer to share with others. Twitter has proven that, in some cases, what you ate for lunch can prove to be remarkable content. However, this is only true if you are already a high profile figure. For the rest of us, success in the online domain rests in our ability to create our own, unique content. Once you have developed a creative marketing plan, that stimulates continued interest in your project, implementing the following strategies will become far more effective.

Note- For this article, we’ll assume that you have already developed professional social network profiles and a website. For more information on design, check out our blog: Why do I need a professional website…

1. Social Network Marketing: Build Your Core Fanbase

There are over 8 million music profiles on Myspace. Want to know how you can make like Waldo and stand out in the crowd? Build a core fan base. Mass friend requests are not an effective way to build real fans. Sure your stats will look great, but are they going to buy your record, probably not. Start by inviting friends that fit your target demographic. (age, location, interests, etc) Rather than just adding them to the page, include a personal message. Provide an incentive for them to visit your site, other than “check out my music.” People love getting stuff for free. Use this opportunity to show your appreciation of their support by offering some form of free content (download, ringtone, e-book, etc). Once you have developed your core fan base, make sure you give them a reason to check back on a regular basis.

Here is a list of important updates:

Personal messages
Daily status updates
New songs
New pictures
Consistent blog entries
News

As you develop a steady stream of media, remember that your goal is to create “remarkable content.” Rather than asking fans to buy your new song, write a blog on how the song came about, or a fun story from the studio. Providing your fans with a personal experience will give them a way to relate to you and your music. If you take the time to utilize these techniques on a regular basis, you will be on your way to developing a dedicating fan base that will support your efforts and, most importantly, tell their friends!

Popular Social Networks:

Facebook
Myspace
Twitter
Bebo
2. Blog, Newsletter, Live chat: Develop your community

Everyone loves to be “part of the group.” If you provide a medium to interact with your fans on a personal level, you will be able to build a community that everyone wants to be a part of.

Creating a blog is a great way to start building your online community. Once you have developed your blog page, embed your blog on your website to make it easy for fans to find. Once again, creating remarkable content is an essential aspect to the success of your blog. It is also important to urge your fans to leave comments and suggest topics for your blog. By providing your fans with a fun way to interact on the site, you will build a personal experience that will help develop your community.

Popular blog sites:

Word Press
Blogger
TypePad
SquareSpace

Sending out an e-mail newsletter is another excellent tool to engage your fans. Make sure your newsletter sign-up is easy to find on your website and social networks. Giving away free content for newsletter subscribers will help boost your submissions. Your newsletter should include news, pictures, excerpts from your blog, contests, etc. Offering creative ways for your fans to be a part of your community is key.

(We use Constant Contact for email marketing. Their site is easy to use and offers excellent services at affordable rates. For more information on setting up your email marketing account, drop us a line at therecordshop1@gmail.com)

Live video chatting is a new trend that has beecome very successful for artists in developing their community. Stickam.com is one of the more popular sites for this application. Live video is a great way to build relationships with your fans. It is much more personal than the other methods because your fans get a chance to actually interact with you in “person.” You can give them a behind the scenes look at rehearsals, studio sessions, and shows. Other popular concepts include: Q&A sessions, online performances, and sessions on the road. Keep in mind that, unlike blogs, your fans “see” everything on live video. It is important to maintain a strong image and attitude when the camera is rolling.

3: Video content: Build your visual presence

As we have discussed throughout this article, it is important to personalize your marketing strategy. While many of us have become accustomed to communicating on the web, visual interaction is still an integral aspect of developing relationships with fans. Since the first video of a cat jamming on the piano, viral videos have been a leading source of online entertainment. You Tube is the clear frontrunner for viral videos. However, sites like Myspace Video, Vimeo, Metacafe, and Daily Motion are also worthwhile platforms to promote your content.

Building your visual presence through viral video is a exceptional method for promoting your music. Once again, the emphasis on remarkable content is important to consider as you develop your viral presence. Remember, you want to offer something different than everyone else. Performance videos are great, but should be supported with other unique concepts. So pick up a camera, hire a videographer, and keep it rolling. You never know when something remarkable is going to happen.

Here is a list of suggestions for viral videos:

Live Shows (with quality audio and a good crowd)
Clips from studio sessions
Interviews
Exclusive performances (shot specifically for your video stream)
Tour video blog
Contest for viewer submitted video reponses

4: Online Media Promotion: Build relationships with the press

Now that you have built your fan base, community, and visual presence, its time to meet the press. Writers are flooded with countless requests from bands everyday. In order to get their attention, you have to take the time to build real relationships.

The local press is a good place to start. Your town probably has a local music zine and several community newspapers that cover local music. Call the office or visit the website to find out who chooses featured artists. Rather than just mailing in a press kit, share your interest in their work. Show your support at their events or on their blog. Through supporting their efforts and networking with their team, you will have the opportunity to build a relationship with the publication. Once you have developed a repoir, invite them out to a show or set up a casual lunch meeting. If you have followed the previous steps, you will be able to provide plenty of remarkable content that will hopefully gain their interest in supporting your project.

Online review sites are also a great resource, but even more difficult to break in to. In this case, rather than competing with your local community, you are up against every other artist on the web. Fortunetaly, you have developed your online presence and understand the importance of building relationships. Just be patient, these sites receive endless requests from artists. Most of them will get back to you eventually, but if you send them a message every day, your likely to get black listed.

The Indie Bible is an excellent resource for online press publications.

5:Internet Radio: Increase your exposure

Internet radio is one of the fastest growing, online promotional resources for artists. There are thousands of broadcasts on countless sites. Taking advantage of this opportunity is the final step in solidifying your comprehensive online marketing plan. Achieving substantial radio exposure takes creativity, time, and a lot of dedication. When done correctly, it can make the difference between making music and making a living making music.

In order to build your relationships with DJs, music directors, and radio promoters, you can use the techniques we discussed in the previous section. You’ll find that stations will be much more supportive of promoting you, if you have a method to promote them. Try offering a promotional campaign that advertises their station, inquire about ad space, and show your support by plugging their broadcast on your sites.

Once you begin to build these relationships, nuture them carefully. While you want to keep them up to date, you don’t want to overwhelm them with information. Invite them to sign up for your newsletter or blog so they can choose to stay up to date with your project. A monthly call, or email, to touch base and offer your support can also be effective.

Here is a list of the top internet radio stations:

Pandora.com
Live365.com
Slacker.com
Jango.com
NPR.org
Shoutcast.com
Radiotower.com
Streema.com

The Indie Bible is an excellent resource for online radio stations.

So there you have it. The 5 steps to effective internet marketing. Now its time to get to work! Remember, the three keys to following these steps are consistency, remarkable content, and…..consistency.

I hope this article provided you with the information you need to developing your online marketing plan . We would love to hear your questions, comments, and feedback! If we can be of any assistance, feel free to drop us a line!

Giovanni-

therecordshop1 (@) gmail.com