Posts

Sonoma Wire Works Releases HigginsPack, a New DrummerPack for
DrumCore

–New Orleans funk drum grooves by Terence Higgins of The Dirty Dozen
Brass Band–

Los Altos, CA – August 19, 2010 – Sonoma Wire Works has launched the
HigginsPack DrummerPack for DrumCore. Terence Higgins, drummer for
The Dirty Dozen Brass Band, brings DrumCore users unique New Orleans
marching style drum loops, variations, fills and drumkit sounds with
a dash of hip hop, funk, R&B, and soul. Higgins says this DrummerPack
is “guaranteed to add a little grease to your tracks.”

HigginsPack was recorded by the original Submersible Music team, and
was pre-configured by them with metadata for use with the DrumCore
search engine, which will help you find content based on feel
(straight, shuffle, etc.), time signature, tempo and other criteria.
Songwriter-friendly “GrooveSets” group related beats, variations
and fills to serve as a construction kit for song creation. All audio
is 48kHz/24-bit and created in a pro studio using state-of-the-art
digital (ProTools HD3) and analog (Neumann, Neve, etc.) recording
equipment. DrumCore works with all the major audio applications and
supports dragging audio and MIDI directly to tracks in applications
such as ACID® 7, Digital Performer® 6, Live 6 and up, Logic Pro® 8
and up, Pro Tools® 7.4.2 and up, Cubase® 4 and up (32 bit), and
Sonar™ 8 (32 bit).

HigginsPack includes 3.5GB of content including 7 DrumKits (24 pads
each) that match 7 GrooveSets (360 audio loops, 427 audio fills, 97
MIDI loops and 41 MIDI fills).

HigginsPack GrooveSets:

Bourbon Street Strut – A traditional slice of New Orleans march.
Intricate rolled snares with some bouncing toms thrown in for good
measure. 70 – 130 BPM

Dirty Dumpster – A trashy, choppy breakbeat groove with funky snare
work and sloppy hats. Great for Hip Hop. 70 – 120 BPM

Fix The Levee – Funky rhythms played on a poppy kit. Sounds great at
the faster tempos. 70 – 130 BPM

Go Go Grease – Upbeat and swingy, this groove is perfect for multiple
genres including Pop, Hip Hop, and R&B. 70 – 120 BPM

Nolafied – A laid back, funky breakbeat that only “The Big Easy”
could provide. 70 – 130 BPM

Swampburn – Thick and murky Nawlins’ march beats. Snare heavy with
some great tom sections. 70 – 130 BPM

Zigawho – Another funky beat with some great snare variations. Start
and Stop breakdowns and splashy cymbals. 60 – 110 BPM

HigginsPack is priced at $79.99, is available at drumcore.com,
sonomawireworks.com, and will be available via most music software
retailers. Demo tracks and HigginsPack info:
https://drumcore.com/TemplateMain.aspx?contentId=100

Requires DrumCore (2 or above) and 3.5 GB of disc space for
installation.

About Terence Higgins and his Drum Kit:

Born and raised in NOLA, Higgins is well versed in the New Orleans
funk style. He is currently touring with The Dirty Dozen Brass Band,
John Scofield’s Piety Street Band, and Swampgrease. In the past, he
has played with Widespread Panic, Dr. John and Norah Jones to name a
few, appears on dozens of albums, and has just released his solo “In
the Bywater” CD. Terence used the following drum kit to record
HigginsPack: Pearl MRX Masters Series Vintage Sunburst with black
hardware, 22×18 bass drum, 8×8 tom, 10×9 tom, 12×10 tom, 16×14 tom,
14×6.5 snare drum (Steve Ferrone Signature), 13×6.5 snare drum (Joey
Jordison Signature), and a 14×6.5 snare drum (Sensitone).

About DrumCore:

DrumCore gives songwriters and composers access to grooves and
instrument sounds of over a dozen famous drummers and percussionists.
It includes a groove library of both audio loops and MIDI files plus a
VST/AU/RTAS software instrument for Mac and PC. DrumCore is expandable
with add-on DrummerPacks. https://www.drumcore.com

About Sonoma Wire Works:

Incorporated in 2003 and headquartered in Los Altos, California,
Sonoma Wire Works develops products and services that help musicians
enjoy playing, recording and sharing music. Sonoma Wire Works’
flagship product is RiffWorks™ guitar recording software with
InstantDrummer, effects, RiffLink™ online music collaboration, and
the RiffWorld.com online community. These products have received
multiple awards for performance and innovation. FourTrack™ and
InstantDrummer™ iPhone Apps, AudioCopy/AudioPaste technology for
the iPhone, the GuitarJack™ audio input device, and the
StudioTrack™ multitrack for the iPad are also by Sonoma. Drum
products by Sonoma include the DrumCore and KitCore plugins and
DrummerPack library, as well as the Discrete Drums multitrack drum
library. https://www.sonomawireworks.com

Eric Normand, author of “The Nashville Musician’s Survival Guide” and accomplished guitarist, teamed up with “For The Record”, to provide some insight on climbing the ranks as a musician in the Nashville music industry. Eric’s upcoming book, “The Nashville Musician’s Survival Guide” provides a comprehensive reference of what it takes to persevere in the competitive Nashville music community.

You can learn more about Eric and his upcoming release at nashvillemusicianssurvivalmanual.com

Whether you are an obscure musician trying to get your music heard, a first-time author putting forth a new book, or an independent filmmaker introducing your first film, you all share something in common; a desire to introduce your art to a world that has yet to learn of it. How do you create an awareness of your project? These are tough times and the aforementioned endeavors are not easy ones. The list doesn’t stop there either. Photographers, artists, songwriters, and others are in the same boat.

The new global economy and a variety of other factors has created an extremely competitive dog eat dog world when it comes to business, and this means we all might have to take some alternative approaches to getting the word out. Without the proper publicity and promotion, no one will know about your great project, products or services. Traditional advertising is too expensive for most, and not necessarily that effective anymore. There is no right or wrong approach, but many believe that social media combined with Internet marketing are essential to most startup creative businesses at this point in time. If you’re ready to take the plunge, here’s how you can dive in.

  1. Build your social pool: Interact regularly on Facebook to slowly build a group of friends, fans, and followers on the Internet. With hundreds of millions of users, it shouldn’t be hard to find a couple hundred that are interested in you. Over time this can grow into thousands. Twittering can be productive as well.
  2. Start blogging: At this point in time, blogging is a powerful tool and can be used to promote literally any business. Create your own blog and write about your areas of expertise. The information you put forth should not only be directly or indirectly related to your products and services, it should also be useful to your targeted audience.
  3. Build a website: While a .com domain is optimum and will help to give your business a legitimate “face”, not everyone can afford one initially. There’s nothing wrong with starting out with a free WordPress (or similar) site. This will allow you to begin building your brand. Your blog should be built into this site or linked to it. This website/blog will serve as a central hub to all your Internet activity, with links to Facebook, Twitter, etc.
  4. Guest Blogging: It can take a while to create heavy traffic on your site. Blogging as a guest on a higher traffic site can help build your readership and drive more traffic to your site.
  5. Online Discussions: Find message boards with themes that relate to your project and interact with group discussions. Offer advice and perspective where pertinent and provide links to articles on your site.

There is a recent article regarding working in the new social media paradigm that offers some useful tip’s that I highly recommend reading – Top Seven Reasons Why Artists Strongly Resist Social Media by Ariel Hyatt.

The online social interaction approach to publicity is no secret, but it is still a new concept to many. Over time, if done correctly, you will build a “readership” that is genuinely interested in what you have to say, so always strive to provide useful information. By building a large group of readers, or “friends”, fans, and followers, you are connecting with an audience that will potentially come to your shows, buy your book, watch your film, and enjoy your art.

Is this easy to accomplish? No. Does this take time and effort? Absolutely, but then again so does any career. Without the proper promotion, nobody will ever hear about your project. If you think you have something good to offer the world, put it out there. Sometimes the best way to learn how to swim is to just dive in to the pool. You might sink and then again you might not, but you’ll never know if you don’t try.

Are you ready to take the plunge yet?

Eric Normand, author of “The Nashville Musician’s Survival Guide” and accomplished guitarist, teamed up with “For The Record”, to provide some insight on climbing the ranks as a musician in the Nashville music industry. Eric’s upcoming book, “The Nashville Musician’s Survival Guide” provides a comprehensive reference of what it takes to persevere in the competitive Nashville music community.

You can learn more about Eric and his upcoming release at nashvillemusicianssurvivalmanual.com
So you just moved to Nashville, you’re a good solid player with a good attitude and excited to begin working. You don’t care about being a superstar, you just want to play music with others but you are quickly learning that this can be hard to do. You are having a hard time getting off the ground. What do you have to do to get started in this town?

Regardless of your talent level, the truth is simply that talent alone isn’t going to get you work. Nashville, like any major music Metropolis, attracts talented people by the masses. They literally flock to this place in droves. This creates a supply and demand problem that works against the musicians. Knowing and understanding this is crucial. Ultimately, the only way in is by slowly nurturing relationships that will lead to opportunities. The best place to build these relationships is in the nightclubs around town. There is no shortcut to this, it’s going to take some time so be patient.

A newcomer to Nashville recently told me his story. He moved to Nashville about a year ago with the goal of becoming a part of the country music scene here. He has been frequenting the clubs downtown with the intention of sitting in and getting to know some of the players. Even though he’s familiar with most of the standards that are being played, he’s having a hard time getting past the idea of hustling to sit in. He said that he views his reasons for networking as self-serving, and this prevents him from talking to musicians because he feels self-conscious about it – like he’s using them. The end result is that he just walks around watching bands, never talks to anybody, and then goes home.

I, as well as many others, can relate. When I first moved to Nashville I was in a similar situation. How does one introduce them self to all these total strangers and maneuver his or her way into sitting in without coming off to self-serving?

One thing that worked for me was seeking out groups of players and artists that I related to musically. This makes it much easier to form real relationships that can evolve over time. Try to find a group of players, or singer that you really connect with. Maybe you really dig their song list, or are inspired by the performances of one or more of the players in the band. If you can feel a real connection through the music, it should be easy to engage in some genuine conversations – the music is your common ground. Find out when they’re playing again and become a regular. Over time they’ll gradually get to know you and sitting in will be part of a natural progression. Maybe try to cultivate a handful of different situations like this. Also, try to find these kinds of inspiring groups that are playing either earlier shifts and/or at the less popular bars. Those situations will be more laid back and might make it more likely for them to take breaks. And that combined with a smaller crowd in general will make it easier to engage in conversation.

The key to gigging in Nashville is relationships. It’s hard to force friendships and relationships to happen, they need to naturally evolve. You need to regularly put yourself in different kinds of situations where this can happen. It just takes time, persistence, and patience. Most importantly, be a good person. Of course being proficient on your axe will help to.

There is no guarantee that this approach will allow you to achieve the kind of success you envision. But for that matter, there are no guarantees in the music business, or life in general. So just suck it up, be in it for the long haul, and get out there and start pounding the pavement. Be friendly and outgoing and put your best foot forward. Talk to people. Take an interest in their careers and lives. Try to find some common ground and build relationships with players that you relate to. If you have already tried this and haven’t yielded much results, try harder.

That’s what it takes to get started in Nashville.

Pier Music Group is an Artist Management Agency with a network of young, energetic, and driven individuals, rooted in the music industry, working together to provide artist management, development & booking.From the artist management side, Pier is involved in planning, coordinating and organizing the careers of its artists. Also from a productions standpoint, Pier can provide every artist with almost everything they need to be successful.

The Record Shop has joined forces with Pier Music Group to offer yet another outlet for emerging talent to develop their projects. You can learn more about all that PMG has to offer by visiting their website at piermusicgroup.com

Be sure to check out Pier Music Group artists Queens Boulevard and Feedback Revival performing on our viral music show Balcony TV Nashville!

Eric Conn of Independent Mastering drops by For The Record to share some insight on preparing for mastering. Eric has mastered records for a variety of artists. From Willie Nelson, Garth Brooks, and John Prine, to Skid Row, Hank III, and Young Buck. Here at The Record Shop, Independent Mastering is our first choice to put the final touches on our records.

You can learn more about their work at Independentmastering.com 

1. Sequence Your Album

Preparing an album sequence before mastering is a must. You can play with the order in iTunes or in your DAW, then make a CD and take a listen! How does it flow? Anything jarring? Does the sequence take you on a journey or tell a story?

2. ISRC CODE

Many radio stations track music via an ISRC Code (https://en.wikipedia.org/wiki/International_Standard_Recording_Code), and digital distribution company’s use this code to track purchases.  Check with your digital distribution company—they may assign a code to you, or you can purchase your own code. The ISRC Code can be imbedded in the TOC at mastering, or you can have it done later. The benefit to having it done at the time of mastering is that the code will be on your manufactured discs.

3. CD-TEXT

Do you want CD-TEXT on your disc? CD-TEXT allows your recording to be identified on some (but not all) CD players.  If you do, please type out: Artist, Album Title, and Name of Songs. Better yet, email it to the mastering house so they have it the way you want it before you arrive!

4. MEDIA

Labeling your mix media is a must, especially if your not attending the mastering session. Artist(s), song titles, sample rate and bit depth are a must when using digital media. Analog media needs reference tones and phase clicks, and leader tape in between the cuts. Other details should include: contact information for the artist, producer, and engineer, with both a phone number and email address. A sharpie with the artist’s name scribbled on the DVD does not count as labeling your media. If you want to be considered a professional, label your mixes. Hand a professional mastering engineer a CD/DVD/Tape with nothing written on it and even if he doesn’t say anything about it, he’s thinking “amateur”.

5. DECISIONS!

Do you like your mixes? Have you made decisions regarding alternate versions of the mixes? Vocal up? Vocal down? TV-Tracks? Instrumental-Tracks? Radio Edits? Being satisfied with your mix is the number one key to having a successful day at mastering. Coming in with all the versions you need to have EQ’d will save you time and money.

6. ATTENDANCE

Are you familiar with the mastering room? If not, bring a reference disc! The reference disc can be anything, but it should be something you are familiar with, something you like. Take 5 or 10 minutes to listen to your reference material in the mastering room before you start making critical EQ decisions in a room you might not be familiar with. Trust the mastering engineer. He / she works in the room every day and knows it. If you’re feeling unsure, take the time to make a reference disc of one or two songs that you can listen to in your car (or other system) before you go down the wrong path in a room you don’t know.

7. Getting What You Want

Sometimes you might not get what you want the first time around. Sometimes you will. Make sure you have a realistic attitude towards mastering and know the limitations of the craft by talking about it with the engineer. Miracles can and do happen in mastering! Or, it may be that you need to remix something. Communicate your needs!

8. Compression on the Mix Buss vs. Compression at Mastering

Get what you want out of your mix buss first. If you like it there, you’ll like it after mastering. If you’re pumping up your mix for your client via a digital limiter to make it “louder”, make sure your mastering engineer knows!

9. Your reference media VS. The mastering reference media

What have you been listening to? Did you mix to tape but all your reference versions have been digital copies bounced to disk? If that’s the case, you have no idea what your mix sounds like. Make your reference versions reflective of your mix media. Then bring the mastering house what you’ve been listening to.

10. Don’t be swayed by price.

Cheaper isn’t always better. Joe Blow in the bedroom charging you $50 bucks an hour after he gets home from his day job is a hobbyist at best. Twenty-seven hours later you’ll have spent $1350 and you might not be any closer to getting what you want than you were at the first hour. Use a professional, in a real studio, with real tools. In 3-5 hours you’ll get what you want and have the peace of mind that the master will be right. Good, Cheap, Quick: pick two.

Coming in prepared will save you money, and your project will go much smoother! These are some of the questions I like to ask my clients, and your mastering engineer may have more or less questions! If you take the time to communicate your needs and the desired outcomes you would like to achieve from the session, you will be much happier with your final master. Your mastering engineer will be happier too!

-Eric Conn (Independent Mastering) 

The annual summer NAMM show was in Nashville last weekend, so we decided to close up The Record Shop and head downtown to check it out. As you probably know, the city of Nashville has been dealt some pretty rough hands over the past few years. The music retail industry is no exception. Sales have dropped more than 20% over the last year, from $7.1 billion in 2008 to 5.8 billion in 2009. Everything considered, we weren’t sure what to expect as we walked into the downtown convention center. We quickly found that many of the major, “corporate” vendors appeared to be (how to put this politely), lets say, “not that excited about being there.” Luckily we ran into some friends and stuck around long enough to find that there were a number of new companies who still had an optimistic outlook. Companies who weren’t jaded by an economy they can’t control, but excited to talk about how they planned to find their niche in the new market. Here at The Record Shop, we always love hearing about unique products that can help artists reach their full potential. This week, we highlight five companies that have embraced the trends of the modern music industry and developed unique products that are sure to be a hit!

Sonoma Wireworks- Mobile Recording for I Phone

If you’ve ever wished that you could keep a recording studio in your pocket, then you’ll love Guitar Jack! Guitar Jack is an iPhone audio interface developed by Sonoma Wireworks. You never know when inspiration is going to strike. With Guitar Jack you’ll always be prepared to lay it down. Wow, after reading that, I kind of feel like the sham-wow guy! Screw it. I really dig this product. I can’t tell you how many times I’ve had an artist bring in a noisy, mobile recording of a new song, and struggle to figure out exactly how they were playing it. We’ve all heard somebody say, “man I had this killer tune yesterday, but I just can’t remember how it went.” Guitar Jack makes mobile recording quick and simple. The device just plugs into the bottom of your iPhone and integrates with apps such as Recorder, Taylor EQ, and Sonoma’s Four Track. Guitar Jack features a 1/4 inch and 1/8 inch input, as well as a 1/8 inch headphone output. 

I had the pleasure of chatting with the Sonoma team during NAMM. When asked how Guitar Jack compares to other devices on the market Sonoma says, “GuitarJack features both a 1/4″ mono jack and an 1/8” stereo jack that can be used simultaneously within FourTrack. Adjusting the analog input level before it is digitized and clipped was one of the most requested features, and with GuitarJack, this is possible with 60dB of input gain and a selectable pad for a total of 72dB of input level control. Additionally, the GuitarJack  has selectable hi-z and lo-z impedance on the 1/4″ input allowing for instruments, line level and microphones. Lastly, the GuitarJack is made of hard-anodized aluminum and made in the USA. The quality of craftsmanship and the range of features really make GuitarJack stand out from other interfaces.”

Sonoma also has a comprehensive product line that offers excellent additions to Guitar Jack. Four Track, is a multitrack recording application that allows artists to record on their iPhone. Four Track allows the user to bounce down tracks while building the arrangement. It easily connects to a nearby computer, using its Wi-Fi sync option, to allow users to quickly export their audio. They also offer an eight track version, called Studio Track, that is compatible with the iPad. Users can also utilize their drum loop application, Instant Drummer, to arrange a groove and import into their Four Track session.  Overall, Sonoma provides a unique line of products that allows everyone, from the novice musician to a seasoned pro, to easily record their tunes.

If you are interested in learning more about the wide-variety of Sonoma’s products, you can visit their website at sonomawireworks.com

Vie Drive- Content delivery system

As the music industry continues to shift its focus to online content, countless digital media outlets have been developed to offer new ways for artists to interact in the viral realm. A Nashville based company called Vie Drive has recently launched a unique product that provides a wide variety of promotional options for artists and businesses. 

Vie Drive is a USB device that incorporates a custom interface which provides a wide variety of interactive content. When the drive is plugged into  a computer, the interactive interface immeditley loads, providing fans with instant access to your media. The interface is automatically updated as new content is posted. Some common features include music, video, photos, web links and a calendar. The program also allows the client to sell banner ads to sponsors.

Vie Drive can be used to share any type of media content. From press kits and promotional material, to concert tickets and fan club membership. It is a great way to gain traffic to your sites as well. The device automatically tracks user activity so artists can easily gauge what there fans are most interested in. Another great thing about Vie Drive is its flexibility. Every artist has different needs, so the Vie Drive team works closely with their clients to develop a unique concept that with help them reach their goals.

To hear more about this exciting new product, drop by the website at viedrive.com

Wheat Ware- Eco-friendly accessories

We are all trying to find new ways to be eco-freindly these days. However, when it comes to musicians, going green is easier said than done. We can’t exactly pack the band’s gear in a Prius and hit the road. Fortunately, an eco-friendly company called Wheat Ware has developed a unique way for musicians to do their part in protecting our natural resources. 

Wheat Ware produces wheat based products in an effort to reduce the use of our world’s forests and natural resources. They offer an impressive line of accessories for musicians., including guitar picks, drum sticks, reeds, and maracas. They feel and play just like their wood and plastic counter parts, but they are 100% biodegradable and non-toxic. Unlike some other crop-based products, Wheat Ware does not use any plastic. Their products are 100% wheat-based and bio-degradable.

You can check out all that Wheat Ware has to offer at wheatware.com   

Zip Box- Unique take on digital distribution

The market trends of record sales continues to be a major topic when discussing the state of the modern music industry. Illegal downloads, combined with the growing trend of free content, has left many artists struggling to find an effective way to sell their music. Digital sales are quickly nearing the number of physical sales, as I Tunes continues to lead as the #1 music retailer. In Q1 of 2010, I Tunes sold 28% of all music purchased in the US. Walmart (17%), Best Buy (14%), and Amazon (11%), round out the top 4. With 70% of music sales held by the top four companies, along with rumors of Google launching its own store, it is surprising that anyone else would join the race. However, a Nashville based company called Zip Box Media has recently launched, and they are up for the challenge!

Zip Box is a digital distribution company that has taken a unique approach to digital content distribution.

Initially, there didn’t seem to be much of an advantage when compared to competitors such as Tune Core, CD Baby, and Snocap. A Zip Box membership currently starts at $18/month ( normally $38), and includes an additional 25% commission on sales.  I asked Paul Wright III (Zip Box Media) how their service was worth the cost. He explained, “It’s all in the content and the data.” As opposed to the I Tunes store, where artists are listed within an endless database of media, Zip Box offers their users a unique, personal website that serves as their store. When a potential buyer clicks on a link to an artists store, they are not distracted by other options, but are provided with a variety of content to browse while previewing the artists material. The Zip Box artist site includes customizable templates, a digital catalog, secure shopping, and secure downloads. Zip Box can also be utilized to distribute text files, software file, images, videos, ringtones, ebooks, midi files, and sample libraries. 

In addition to their own unique store, artists are provided with updated data on sales. They can view a detailed breakdown of sales as well a data on specific buyers, demographics, markets, etc. With this information, users can gauge the effectiveness of their promotional strategies and adjust their campaigns accordingly. The site also allows artists to create an automated thank you message that is sent every time someone makes a purchase. This allows artists to maintain relationships with fans, and offer additional content as well. Zip Box’s data feature is a great advantage for independent artists who want to maximize their marketing strategies. 

Further information is available at zipboxmedia.com

Mobinek0- Short Run Vinyl Pressing 

Over the past few years there has been an almost cult-like resurgence of music lovers who prefer listening on vinyl records. This growing demand has led to several major artists offering vinyl versions of their new releases. As a result, vinyl sales have continued to rise steadily, reaching 1.9 million units in 2009, a 33% increase from the previous year. Many independent artists have taken note of this trend, but there are only  a handful of companies that offer affordable, short run vinyl production.  I ran into Richard Dron of Mobineko, who shared how his company was taking a unique, personal approach to an industry based on mass production.

Mobineko is a British owned CD, DVD, and Vinyl manufacturing company with a factory based in Taiwan. Mobineko offers short run vinyl pressing starting at as few as 50 units. They have a great variety of colors and designs to choose from. Mobineko is a tight-knit group, with about 20 employees that oversee the operation. This gives them the opportunity to interact directly with their clients, so when you call their office you’ll actually be talking with a real person who will be available to assist the client throughout the manufacturing process. Imagine that! They also have an extensive quality and price garauntee on their services. This level of dedication to the genuine support of their clients is hard to come by these days, and makes Mobineko an excellent choice for Independent artists who are looking to take their first run at vinyl releases.    

You can learn more at mobineko.com

Have you used any of these products? Have on opinion on how these products will fair in the market?

We would love to hear your questions, comments, and feedback! If we can be of any assistance, feel free to drop us a line!

Giovanni-

therecordshop1 (@) gmail.com

Barry has teamed up with For The Record to share his reviews with the latest in recording products. Barry is a recording engineer/producer and contributing editor for MIX Magazine, ‘New Toys’ columnist for L.A.’s Music Connection Magazine, and writer for www.prosoundweb.com. He also is editor/writer of Gear Lust, his online special review section at www.barryrudolph.com

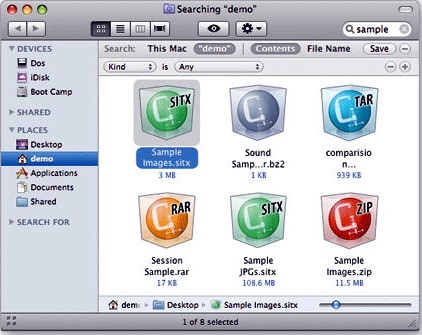
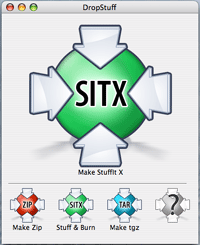
I installed the 2009 version of Smith Micro’s Stuffit Utility into my G5 MAC and discovered Drop Stuff, the whole compression side of the seemingly lowly free utility we all used called Stuffit Expander. Drop Stuff is better than ever with a new interface and built-in AES 256-bit encryption.

First of all with Drop Stuff, with its patented 24-bit image compression, has TIFF, PNG, GIF, and BMP compressors and you can compress files by to 98% of their original size (depending what they are). Squash and optimize MP3s, PDFs and images to save hard drive space and time when sending them over the Internet. Even JPEG photo files (an already compressed format) can be reduced up to a further 30%. Drop Stuff creates Stuffit, Zip and TAR archives–you just drop your files and folders on the appropriate icon on the super simple GUI. I liked the Stuff & Burn mode where it stuffs and sends the file to the MAC’s CD/DVD burner in one operation. Sweet!Smith Micro Stuffit Deluxe 2009

Expander now expands 7-Zip archives and segmented Zip archives along with files using any of 30 different compression formats–even encrypted Zip archives. I like browsing my archive of files without waiting for expansion using the Stuffit Archive Manager. You can preview thumbnails, add, delete and change files and save searches with Stuffit Collections.

Other cool features you get are: upload directly to FTP, MobileMe, iDisk or multiple CDs or DVD-ROMS, and restore files to original locations Stuffit is Finder-aware so you can preview compressed archives inside MAC’s TimeMachine.Smith Micro Stuffit Deluxe 2009

Using Stuffit Deluxe 2009 for MACs is like doubling the size of your hard drive for storing pictures and music. You can put off buying another drive and the work transferring files by buying it for $79.99 as a download from: my.smithmicro.com/mac/stuffit/index.html

Maintaining a dedicated fan base is one of the most daunting tasks faced by musicians. We all know the importance of social networking, working the press, and promoting shows. If only there was a way to incorporate all of your promotional efforts into one source that could be easily distributed to your target audience. Well guess what? There is! It’s called a newsletter. Newsletters are a simple and effective way to build a “community” around your music, while keeping in touch with your fans on a regular basis. This week we discuss the three reasons why every musician should have a newsletter. 

 1) Build a real fan base

Want to know the secret to developing a solid fan base (after you write good songs)? Offer valuable content to your fans. David in Portland is probably not going to visit your site just because you sent him a comment about your new song. Now, what if you told David that by signing up for your newsletter he would receive a free download of an exclusive song that you wrote while touring in Portland. I’d bet your odds of a response would be looking much better. 

There are many great ways to build your fan base by offering valuable content through a newsletter, but first you will have to develop your mailing list. Incorporating a news letter sign up box on all of your web sites is a great way to start. Offering free content for newsletter members is an effective way to encourage potential fans to sign up. 

Unlike a social networking site, where members can join your page with a simple click, your fans will have to share their email address in order to join. Due to the endless amount of spam email’s generated on the web, most people are not likely to give out this information unless they are going to receive valuable content in return. Therefore, an email newsletter gives you the opportunity to connect with fans that have a genuine interest in your music.  

2) Stay in touch with your fans

Most artists have a wide variety of viral outlets for their music. There’s myspace, facebook, twitter, youtube, reverb nation, last fm, band camp, just to name a few. If you have spent any time promoting your music on the web, I’m sure you have noticed that it can be difficult to keep your fans interested in all of your pages. Most fans just don’t have the time to browse through every page. With all of the artists out there fighting for attention, it can be difficult to stand out amongst the crowd. One of the greatest advantages of an email newsletter is the ability to share all of your sites and content in one place. 

Your newsletter can also be a great way to interact with your fans through fun contests and promotions.Through offering exclusive promotions for newsletter members, you can maintain interest in your music and establish value within your content. You can also build relationships with your fans through incorporating a fan of the week, answering questions from fans, or encouraging them to vote on a poll related to your music. There are endless possibilities for creative fan participation within a newsletter. 

Promoting upcoming shows is another effective aspect of an email newsletter. It’s great to post events online and throw up flyers around town to promote a gig. However, with your newsletter you can communicate directly with your core fan base. If you are planning on touring, you can organize your mailing list by region and send out invites to fans in the surrounding areas. With an event posting or flyer, you are limited to the basic details of your show. In a newsletter you have the opportunity to tell your fans more about the performance or offer discounts and giveaways to members who attend.

3) Connect with the press

A newsletter is an excellent way to build rewarding relationships with press and radio. These companies receive countless messages every day from artists who are looking for valuable exposure. If you want a shot at gaining entrance to the gatekeepers of promotion, it is important to offer plenty of valuable content. Mailing a press kit is great, but your banking on the chance that your cd makes it through their endless pile of submissions. If you work on developing a relationship and can make it into the coveted inbox of a writer, you will have the opportunity to maintain their interest with your valuable content.

As we discussed earlier, showcasing valuable content is essential to maintaining your fans interest in your project. This is even more important in connecting with the press. Everybody is releasing new songs and playing shows. The key is to show that what you are doing is notable enough to share with their audience. It is also important to consider how your content could be beneficial to the press. For example, if you are using a product, website, or promotional campaign that has been effective in developing your project you could share your experience and explain how it could benefit their readers. 

Once you have received some coverage, you can use your newsletter to share this content with your readers. Through including a link to the article in your newsletter, you can show your appreciation of the press outlet that showcased you project. This method of promotion can go a long way in developing long-term relationships with the press. If you can provide an outlet to draw traffic to a publication, your value to them will greatly improve. 

Are you ready to promote your music with a email newsletter? Still wondering if a newsletter is right for you?

We are happy to answer any questions and help you get started in developing your content! Drop us a line…

We work with Constant Contact to create valuable email newsletters for artists and businesses. We are now offering a free trial of the program. Feel free to drop us a line for more information!

As always, we appreciate your feedback! 

Feel free to leave us a comment with your thoughts, experiences, suggestions, or anything else you’d like to tell us about! 

 Want to hear more from The Record Shop? Sign up for our newsletter here…

Barry has teamed up with For The Record to share his reviews with the latest in recording products. Barry is a recording engineer/producer and contributing editor for MIX Magazine, ‘New Toys’ columnist for L.A.’s Music Connection Magazine, and writer for www.prosoundweb.com. He also is editor/writer of Gear Lust, his online special review section at www.barryrudolph.com

The two-rack space Crane Song Egret is an eight-channel summing/mixer specifically designed for both straight ahead DAW mixing and composite mixing where both virtual instrument or other audio sources are mixed together with DAW audio tracks. To accomplish this, there is a lot of impeccably built technology packed behind the beak of this bird!

The ultimate aim for an audio equipment designer is purity of sound and to that end Egret works transparently–a pure system that adds no gain or ‘coloration’ to the overall sound. However to satisfy music producers/mixers who depend on their equipment for a certain “je ne sais quoi” quality, Egret also has a Color control knob for each of the eight inputs. It adds (or subtracts–depending on your perception) a certain analog softness to edgy audio sources.

Read Barry’s Mix Magazine Feature Article Called “Strictly Summing.”

Egret uses eight D/A converters just like those used in Crane Song’s Avocet mastering monitor controller. Supporting rates up to 192kHz, a Cirrus Logic 4398 D/A chip is used along with an 8421 SRC chip (sample rate converter used for input jitter reduction) surrounded by Analog Devices OP275 amplifiers for interfacing to the unit’s discrete Class-A summing and mixing bus circuitry.

There is a front panel switch to disable the SRC for cases where lower latency is required and the Source switch chooses the unit’s digital source between three inputs: AES/EBU (4) XLRS, ADAT Lightpipe, and a third ‘yet to be determined’. Currently the converters and the interface supports AES single wire to 192KHz, ADAT, and S/MUX to 96kHz and can be upgraded as the technology changes. The converters will also independently operate even at different sample rates if required.

Features And Front Panel

Each channel of Egret has a level control, a cue send, and pan control. Each channel also has an analog/digital source button where either the output of the eight-channel analog-to-digital converter or an alternate (eight rear panel TRS jacks) analog balanced line input can be selected. The alternate Analog Inputs could be used for virtual instruments running along with the mix or live sound sources such as in a DJ or FOH mixing application. You could also use them as returns from external processing gear.

To add external processing to any channel in Egret you would send to outboard gear from the direct out (eight rear panel XLRs) and return its output to the analog input. By switching between the digital (actually the output of the D/A converter) and Analog In you could A/B the inserted processing.

There are both solo-in-place and mute buttons on each channel’s line up and a built in Aux send bus with Master level control that works for either a cue system or as an effect send. The headphone monitor jack’s output follows the stereo bus output for a monitor mix when Egret is being used in multi-channel location recording.

Also borrowed from the Avocet’s design is the master bus level control. It’s a Grayhill rotary shaft encoder that drives a microprocessor-controlled bank of relays for super-accurate and repeatable 1dB stepped attenuation. An absolute necessity for recalling mixes, the stereo gain matching is better than 0.05dB.

Egret is built so that the stereo, and cue buses can be chained together to create a many input system. With a special cable, Egret’Äôs bus can be tied to a Crane Song Spider to sum additional analog inputs for complete DAW recording and mixing/interface system.

The Egret Flies

My first test was to reassign the outputs of an “in the box” Pro Tools mix I had already done. I reassigned it into four stereo stems. I wanted to keep my mix the same and compare my stereo mix with the Egret’s analog sum of the stems. I configured Pro Tools’ I/O to send ADAT Lightpipe digital audio out the 9 through 16 ADAT spigot of my Digidesign HD192 interface unit. I set up drums and bass to outputs 9-10, guitars to 11-12, keyboards to 13-14, and vocals plus all effect returns on 15-16. All four Pro Tools stereo master output faders were at 0dB positions (unity).

I ran all eight Egret channel level controls at full CW, appropriately pan odd/even channels let and right, and the Master level at one LED dot below 10. Again like my Avocet volume control knob there are green LEDs ringing the stereo level control to show levels in 1dB steps.

The stereo LED meter on the Egret shows peaks levels at about 2/3 of full scale–obviously Egret has tremendous dynamic range with substantial headroom to spare. I connected my Benchmark Media ADC-1 to convert the Egret mix to digital and sent an AES/EBU signal back to a new stereo mix track in Pro Tools via the AES Enclosure input. Also everything was clocked from the ADC-1.

Since I wanted to check for any differences between my ITB mix summed inside of PT with the Egret’s analog summing, I had to place the same stereo plug-in processing chain on the Egret summed mix back in PT.

The result was both mixes matched closer than I would ever imagine. So does this prove anything? Considering I’m doing two extra conversions: the D/A in the Egret and then the A/D in the Benchmark and applying the same stereo processing, I was surprise that the Egret was this transparent and that the eight channel inputs tracked each stem’s level so exactly. It is a testament to the quality and design of Egret, the quality of the converters used and lastly the accuracy of Pro Tools HD Accel.

So why go through this setup if it ends up sounding about the same? The answer is that you gain more mix control valuable when mastering or supplying stemmed mixes in post-production jobs.

Separate processing of mix stems goes back to George Martin and the Beatles when he would mix their mono singles to a ‘twin track’ (2-track) tape deck with vocals on one channel and the track on the other. In mastering he would compress and EQ the vocals and track differently and recombine them for maximum punch and loudness.

I Go Deeper

So my next test was to apply the same stereo bus processing I put on the entire stereo mix separately to each of the four stems. For this song I had: WAVES’ SSL Stereo Bus compressor followed by the Sonnox Stereo Limiter and followed that with Sonalksis’ SV-517 Stereo EQ. Of course in a big and powerful Pro Tools rig (like mine) this is all easy to do–no need to buy three more hardware stereo EQs, limiters, and compressors you’d need if we were working in Abbey Road studios circa 1965!

I put those plugs all set the same across each of the four stereo stem masters. Immediately the Egret’s stereo master had to come down 5dB with the increased average level jump of each of the stems. The mix was all wrong necessitating new vocal rides, drum sound changes and everything else.

For this to work I would have to start a new mix using this stem configuration. After a little work starting a new mix, I could hear that the vocals took on more clarity especially after readjusting EQ and compression and doing new gain rides. I tried compressing the drums and bass more without affecting the rest of the song’s instruments and vocals. Since my stem masters in PT are automatable, there are loads of creative opportunities with regard to remixing tricks and general mayhem.

I also had a chance to see what the Egret’s Color controls did. It is a very subtle effect most noticeable on electric guitars. It mellows out any abrasiveness in the sound without a big shift in loudness. Applied to all the stems, it is another sonic choice you cannot get in any other way I know of.

I’ll Take Four Please!

So my only wish is for at least four Egrets interconnected for 32 mix channels. I’d set them all the same at unity and all odd/even, left right for standardized recall. Like my Crane Song Avocet and Phoenix TDM plug-ins, the Egret is a big winner for me. All pro all the way, it is one of the most flexible, great-sounding summing/mixing systems I’ve used so far’Äîand I’ve tried a lot of them! It sells for $5,600 and for much more go to: www.cranesong.com/downloads/egret%20data.pdf

Recording engineer/producer Barry Rudolph is a contributing editor for MIX Magazine, ‘New Toys’ columnist for L.A.’s Music Connection Magazine, writer for www.prosoundweb.com. He also is editor/writer of Gear Lust, his online special review section at www.barryrudolph.com. Barry has teamed up with For The Record to share his reviews with the latest in recording products.

You can check out Barry’s past articles, reviews and commentaries printed in these journals as well as many other magazines at:

https://www.barryrudolph.com/pages/magazinesdirectory.html
SPL aka Sound Performance Labs is an old hand at level-independent dynamic processing with the invention of the Transient Designer and the Transient Designer plug-in, two of their best products. But the new DrumXchanger drum replacement plug-in might eclipse that triumph. DrumXchanger will replace drum sounds in multi- track sessions no matter the level changes and track dynamics. All drum hits are tracked and replaced including ghost notes, fast fills and rolls. It will do this in real time and in sample phase-accuracy with the original signal.

DrumXchanger comes with a collection of SPL’s high quality 24-bit/96 kHz multi-samples. The library was recorded using SPL preamps and processors and includes three drum kits with one snare, one bass drum and four toms each. Every multi-sample is made up of up to 80 sounds in sixteen dynamic levels and five variations. DrumXchanger will also use .wav sample files as well.

DrumXchanger comes as Native only in RTAS, VST and AU versions for Macs and PCs and features two Transient Designers to process both the original sound as well as the replacement drum sample.

I installed DrumXchanger in my Pro Tools HD 3 Accel rig and was presented with a large GUI that allows for the very precise programming, processing and detection of the original sound for the generation of a triggering signal. Besides the capability of tuning the sample file +/-1 octave in real-time, you can change the phase of the drum sample in relation to the original sound; and externally trigger the sample from an external source via the sidechain input. (DAW program permitting).
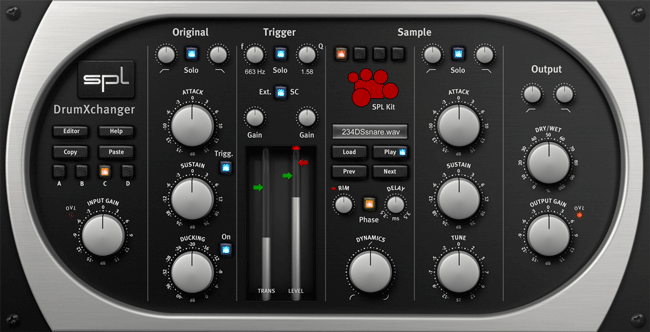
SPL DrumXchanger
To Explain The Processes And Features Of DrumXchanger Completely, 
Here Are Descriptions Of The Plug-In’s Five Sections As Controlled By Its Excellent GUI.


Section 1–Input

There are four automatable and switchable plug-in setups: A, B, C, and D. These are convenient ways to store complete sets of plug-ins settings and switch between them on the fly. Great for tracking drum performances with very wide dynamics or changes in stick techniques, you can copy and paste your best working setup from one to another and tweak the copy for a special triggering or changing samples as required for certain song sections.

This section has an Input Gain range of +/-15dB for the original drum sound that does not change the triggering level setting. You can tailor the original sound using the high (20Hz to 11kHz) and low pass (20Hz to 20kHz) 12dB/octave filters. The Solo button quickly checks the sound quality of the original.

Section 2–Transient Designer And Ducker

Next comes Transient Designer #1 (of 2) to modify the original drum sound. Just like SPL’s original TD hardware unit and their plug-in, you can alter the attack portion of a percussive sound by +/- 15dB and sustain or ring out portion by +/- 24dB.

A Ducking feature with a range of 0db to -40dB is added here that adjusts the level drop of the original drum sound during the time the sample plays. Ducking sounds like a big compressor squashing down the original sound only momentarily. Pushing the Trigg button “copies” the TD processing to the trigger signal sidechain as well as the original. Reducing the sustain portion (that contains leakage etc.) of the original sound with TD will make for a better triggering action of the sample.

Section 3–Trigger

The Trigger section uses a bandpass filter to precondition the trigger signal. This is a full-range filter starting at 20Hz and going to 20kHz. It has an extreme range of Q values– 0.05 to 50! A Solo button lets you hear the effect of the filter and tuned it to (typically) the basic center and predominate frequencies of most of the energy of the original drum’s sound. Adjusting the Q will refine immensely the trigger performance both in accuracy and speed!

After filtering you may need to readjust the Trigger Gain from 0 to +48dB for proper detection. It is recommended to set the Trigger Gain high enough so the loudest drum hits make the Level meters hit the max peak LED (red light flashing). This guarantees that the loudest sample (of multi-samples) is being played.

The Rim control red arrow ranges from 0-100% and adjusts the level for the individual rim sounds for the included SPL multi-samples of snare and tom sounds. This is to set the desired difference of the rim sounds in relation to the regular drum hits. There is also a Rim knob control to set the input level of all rim samples available in the SPL drum kits.

There are two threshold adjustments in DrumXchanger with two LED peak reading meters. There are two green arrows to adjust triggering threshold–they slide up and down adjacent to these meters. In the default advanced triggering mode, both green arrows’ threshold settings have to be reached for DrumXchanger to play a sample. The green arrows (handles) should be set low enough to ensure triggering but not too low to produce false hits on leakage or crosstalk.

The Ext. SC button activates the side-chain for external trigger such as a recorded drumhead trigger microphone track.

Section 4–Sample

The Sample Section has two parts: sample selection and sample processing. Living up to its name, DrumXchanger’s method of sample selection is one of its best features. The loading, auditioning and playing of any sample from any drive in your system is elegantly handled in this plug-in.

Clicking the Load button allows navigation to the folder where your drum sample .wav files or the .splx files in the SPL Kit folder exists. You virtually load the entire contents of the folder once you navigate to it. For easiest access, I’ve gotten into the habit of copy all my possible drum replacement sample candidates into a “samples” folder and placing it inside each song session folder on my Pro Tools work drive.

I say ‘virtually’ because you are able to step through the list of samples in your folder, using the Next and/or Prev(ious) buttons, and audition each sample using the Play button for when the song is stopped or hear them automatically triggered when the song is playing. This is an incredible feature!

If you select a SPL Kit by clicking on the drumkit icon in the GUI, you get an entire kit of kicks, snares, and toms ready to go–just select the individual drum on the icon and get it now. At some point it would be good if SPL releases a software utility to build your own SPL kits using any samples you like.

All the SPL drum kits offer individual rim sounds for snare drums and toms to be mixed with the sample sounds, and the SPL kit sounds offer 16 velocity levels recorded in 5 variations, summing up to 80 individual hits per drum sound!

The Sample selection section also has a Phase reverse button for flipping the sample’s polarity 180 degrees if you hear cancellation problems. A Delay control adjusts the samples time up to +/- 3.5ms if you perceive double hits on fast rolls and fills.

Lastly, the Dynamics control lets you determine whether DrumXchanger follows the original drum’s dynamics or not–or any amount between these two extremes. You can go from exactly following dynamically and triggering on every ghost note precisely or have the new sample fire the same loudness every time.

Sample Section Processing

The other half of the Sample section processes only the sample(s) you are firing. There are the same high and low pass filters and a Solo button to listen only to the sample. Transient Designer #2 processes the sample and there is +/- 1-octave sample pitch adjustment knob located here.

Section 5–Output

For processing the finished sound–the mix of original drum sound and added sample is the job of the Output section. Again there are the high and low pass filters and the section finishes with a Dry/Wet knob, Output level control and Overload LED.

In the Studio

When mixing Pop Rock and R&B songs here at my Tones 4 $ Studios, I’m often asked to replace or augment the recorded kick and snare sounds. I usually use Digidesign’s DrumReplacer or Drumagog. But not any more!

Invariably when the producer and/or artist come in to take a listen to my mix, they like what I’ve done but want to explore and add some other kick and snare sounds to what I’ve done. I’ve had as many as six different snare samples mixed with the original live kit–don’t ask me why.

With DrumReplacer or Drumagog, I would always record the sample and tweak individual hits here and there because they are late or flam or just be missing in action–not triggered at all. I still like to record my new samples with DrumXchanger but it is a luxury knowing I can recall it and fire a different or an additional sample.

The producers I work with love the auditioning ability of DrumXchanger. Being able to hear any sample fire while the rest of the track plays is awesome. We also like having the Transient Designer and the tuner for exactly dialing in the sample–sometimes that is all that is needed to “marry” a new kick drum sample to the rest of the kit.

On a Rock song with a very ambient drum kit sound–lots of leakage on all the close mics–I wanted to add another snare sample to the piccolo snare. The close snare mic track was full of hi-hat spill and kick drum leakage plus the drummer played a lot of ghost notes and a few fast rolls.

First thing was to slightly filter the snare track using the high/low pass filter in the Input section and then adding a little more attack using the Transient Designer. Reducing the sustain with TD helps tremendously with the hi-hat spill and kick drum leakage but I wish there was a way to use the TD only for the trigger signal.

I used the Trigger section’s bandpass filter to “tuned” to the snare drum’s “box” sound at 874Hz with a Q of 7.74. This killed most of the high and low frequencies so now the kick and hi-hat leakage was nearly gone from the trigger signal.

I chose a Ludwig Black Beauty sample from a folder of snare samples and getting DrumXchanger to follow the original snare drum track on two and four was no problem. By looping song sections, where the drummer played a couple of fills and ghosts, I adjusted the green arrow threshold handles and the threshold controls themselves until DrumXchanger followed all hits perfectly. Since I was going to mix the original with the new sample, if the very first attack of a fast roll doesn’t trigger, it was not the end of the world. I did manage to tweak until even the quieter first strikes fired the sample.

Once I was satisfied with the general operation of the triggering, I copied this setup from A over to B and readjusted B for the touchy areas where I needed more trigger sensitive and/or a lower threshold. These lower settings wouldn’t fly for most of the song without occasional false triggering.

Since you can automate changing from Setup A to B, I went down the song and changed to Setup B for those touchy moments. I was now finished.

When the producer arrived, he didn’t like the sample I used but, since I had already done the work of programming the triggering etc., I just stepped through my snare drum collection until he heard one that worked for him. I adjusted the mix with the Wet/Dry control and moved on with the rest of the mix.

DrumXchanger is now a mainstay in all my mixes! For the first time I am satisfied with the whole drum replacement process! Something I’ve always thought to be extra-tweaky work for usually dubious results and sometimes, uncertain worth. I big, big thumbs up for DrumXchanger! It sells for $449 USD (299 EUR) and for more information visit www.spl.info.