Posts

In part 3 of Behind the Gear at The Record Shop, we take a look at the Tube-Tech CL1B Opto Compressor; a device that has become a studio standard since its release in 1987. The CL1B was developed by Tube-Tech founder, John Peterson. John began his career as a maintenance engineer at the Danish Broadcasting Company. Educated as an electrical engineer, he could usually be found refurbishing gear in his spare time. In the early 80’s his interests turned to tube driven devices such as the Pultec EQ and the Teletronix LA2A. As was the case with many of today’s audio manufactures, John witnessed the growing market for vintage equipment as the quality of modern products was, believed by many, to be declining. He began designing his own renditions of classic equipment, and the rest is history. Tube Tech is now a mainstay in the world of audio, and they continue to produce superior quality tube equipment that has been utilized by everyone from The Rolling Stones to T-Pain.

The design of the CL1B was modeled after the Teletronix LA2A, a classic tube limiter that has been a standard in recording studios since its release in 1965.  John set out to build a device that offered the warm, musical compression of the LA2a Limiter, but with the added features of a compressor. The LA2a has only two controls, Gain and Peak Reduction. The attack and release times are fixed.  The CL1B features a fixed attack and release mode, but also provides additional ratio, threshold, attack, and release knobs. This allows us greater flexibility to achieve the perfect settings for a variety of applications. The Cl1B has another unique setting called Fixed/Manual Mode. This setting has a fixed, fast attack and variable release. You would think that this compressor would come with a two week class to learn how to utilize all of these options. However, the operation is fairly simple and always produces great results.

We lean on this compressor mainly for Vocals and Bass. On vocals we often use the CL1B, in conjunction with an 1176 or Distressor, to add a smooth, warm compression that helps the voice find its space in the track. In the bass world, the CL1B is great at taming the tone, but if you’re going for punch, we lean on some of our other options such as the 1176. From time to time, we will throw a snare or kick through the blue monster to give it some extra warmth as well.

One trick that we have found to be pretty exciting on vocals, is an extreme compression setting that can result in some pretty wicked tube saturation. We start by setting the attack all the way to the left, with a medium release and 10:1 ratio. Next we increase the threshold to hit -10 or so DB of gain reduction; tweaking the ratio and release to taste until the vocal starts to drive. The result is an analog tape like compression that can be perfect for a rocking vocal.

Thanks for dropping by! Check back next week for our next installment of “Behind The Gear at The Record Shop”, where we take a look at a throw back to Abbey Road, the Chandler TG1 Limiter. In the meantime, feel free to drop by our Gear Page for more information on our vast array of equipment.

As always, we love to hear feedback on our articles. If this was helpful, or a complete waste of your time, let us know! We love making new friends as well. Feel free to drop by our page on Facebook and sign up for our monthly newsletter to receive valuable resources and updates on the studio. Thanks for dropping by For The Record. Catch you next week!

-Giovanni

Therecordshopnashville.com

Welcome back to behind the gear at The Record Shop. Are you ready to roocccck!?!?!? (cue stadium of screaming fans) This week we take a look at the Purple Audio MC77. The MC77 is a superior recreation of the legendary URIE 1176 Peak Limiter. This piece of gear bleeds rock and roll. If it was magically transformed into a person it would make Slash look like Yanni. From Drums to guitars to vocals, this thing will give you clarity, punch, and attitude for days. Let’s start by giving you a quick back story on the MC77’s estranged father, the URIE 1176.

The 1176 was designed by audio legend, Bill Putnum in 1967. Bill was a revolutionary in the audio world. He is noted to have been the first cat to use artificial reverb, double a vocal recording, and develop a multi-band equalizer. So it is no surprise that he was also the dude that created what is arguably the most commonly used limiter in modern recording. The 1176 became the first true peak limiter with solid state circuitry. It was popular for its super fast attack time, resulting in a signature tone that can be heard on countless records.

In 1997, a new audio company called Purple Audio released their first product, the MC76 (If you paid attention in roman numeral class you’ll get it). Designed by Andrew Roberts, the MC76 looked like an 1176 that Barney got a hold of in the restroom, and it sounded like one that hung out with Jose Canseco (if your not hip to baseball or the news, he did a lot of steroids). It had all the vibe of a vintage 1176 without the price tag, and it quickly became a highly sought after piece of gear. The MC77 is an update of the original with a few extra features.

Aside from the paint job, the MC77 really stands out in the crowd. It has the sonic characteristics of the classic, vintage 1176 with an improved high frequency response and added grit. We’ve used it on just about everything when we are looking for something to give a track some attitude. If we want to add some punch to drums, smooth out guitars, round out a bass, or put some rock in a vocal, the MC77 delivers every time.

We have one trick in particular that produces some really unique results. But in order to explain clearly, let’s start with a story. At some point back in the day, there was an audio engineer who spent way to much time playing with the gear in the studio. One day he said, “Hey, I wonder what would happen if I pressed down all of the ratio buttons on this limiter at the same time?” Once he had all four of the ratio buttons locked in place, he cranked the input and the rest is history. There are a few different names for this trick; all buttons in, nuke, British mode; but the result is a super compression that has been used to create some really unique sounds. I’m a big fan of smashing the drum room mics with this setting. The setting creates a lag in the attack time, resulting in extra punch, and a drastic compression slope, resulting in a quick drop in level. As this push and pull repeats with each transient hit we can achieve a rhythmic pumping of compression that breathes with the track and amplifies the “room sound”. Listen to any modern rock record and your bound to find this effect in play.

And that concludes this evenings presentation. Check back next week for our next installment of “Behind The Gear at The Record Shop”, where we take a look at another colorful device, the CL1B tube compressor. In the meantime, feel free to drop by our Gear Page for more information on our vast array of equipment.

As always, we love to hear feedback on our articles. If this was helpful, or a complete waste of your time, let us know! We love making new friends as well. Feel free to drop by our page on Facebook and sign up for our monthly newsletter to receive valuable resources and updates on the studio. Thanks for dropping by For The Record. Catch you next week!

-Giovanni

Therecordshopnashville.com


Barry Rudolph has teamed up with For The Record to share his reviews with the latest in recording products. Barry is a recording engineer/producer and contributing editor for MIX Magazine, ‘New Toys’ columnist for L.A.’s Music Connection Magazine, and writer for www.prosoundweb.com. He also is editor/writer of Gear Lust, his online special review section at www.barryrudolph.com

Ohm Force Ohmicide


Ohmicide is from the French company Ohm Force’s Melohman family of plug-ins. Ohmicide is a distortion plug-in that is completely malleable in nearly every way possible. It starts by splitting audio into four frequency bands each with six different processing modules. The modules are: M/S matrix, noise gate, dynamics, distortion, make-up gain, pan, and it finishes with an acoustic feedback path. I liked the dynamics processor with its Shape control (a low-level compressor) and Body (basically it acts like an expander or limiter of sorts).

The Distortion processor module has three variants, Standard, Xxx, and Odd of 37 distortion algorithms making a total of 111 Types of distortion. A distortion Type is further adjustable using a Gain control, a DC offset control called Bias that simulates the erratic behavior of broken audio gear, and the Alt knob changes the underlying algorithm of the Type. The main graphic at the top of the plug’s GUI is an audio oscilloscope that shows: input, output, or both together superimposed and a second bar chart below shows where the filters of each frequency band begin and end. Somewhat useful and cool looking, you get an idea of what is going on but, as always, my ears tell me what’s really going on–complete audio mayhem!

My main use for Ohmicide is in mixing where I want to “rough” up certain tracks so they cut better or they take on a particular character and prominence. With a plug-in this deep and rich, I start with a preset to get close to what I’m looking for. For sound designers Ohmicide represents a major new tool for endless experimentation–you’ll never leave your studio!

The factory presets come in folders of twelve called MegaPatches and are selected via a MIDI keyboard or by clicking on the GUI. They are designed, tested and named for specific applications. Cool! They are: BassXxxxx for electric bass; DrumBassXxxxx is for Bass+Drum mixes; DrumXxxxx (my favorite!) is super for drum kits or loops; GuitAmpXxxxx sounds like the worst guitar amps ever made on fire; MiscXxxx are for general purpose grunge; and PercXxxx presets are for singular drum kit pieces like snares and kicks.Ohm Force

Available in RTAS, AU and VST formats for PC and Macs, Ohm Force Ohmicide:Melohman sells for about $125US and is now my “go to” filth box. I have many guitar amp simulators and other garbage makers but none as totally variable at Ohmicide or comes with as many great starting presets. Order up some dirt at: www.ohmforce.com


Barry has teamed up with For The Record to share his reviews with the latest in recording products. Barry is a recording engineer/producer and contributing editor for MIX Magazine, ‘New Toys’ columnist for L.A.’s Music Connection Magazine, and writer for www.prosoundweb.com. He also is editor/writer of Gear Lust, his online special review section at www.barryrudolph.com

SoundToys PanMan

PanMan is a rhythmic auto-panner plug-in with a groove control feature. In stereo mixing, changes in the basic nature of a vocal or instrument track are limited to the level or loudness of a track, its equalization/tone, whatever added effects (reverb, chorus, flanging delays etc), and it’s panoramic position–it’s placement across the stereo field as created by left and right placed loudspeakers.

PanMan addresses and allows full access to this important aspect of mixing with tools that offer new panning treatments that go way beyond the abilities of classic hardware analog panners such as PanScan or Spanner. PanMan will control the pan type, reaction time, pan position, and pan width–even beyond the physical position of your stereo speakers.

PanMan has six modes including two rhythm modes complete with a user-programmable rhythm editor and numerous parameters for precisely determining the way any mono or stereo track in your mix can “dance” across the speakers. Some of the panning actions possible are: ping-pong triggered panning and random triggered panning with user-definable trigger divider as found in the PanScan hardware unit; and LFO-style continuous panning with selectable pan shapes and precise dynamics control. After installing PanMan into my Pro Tools HD rig I was panning everything as if I was discovering stereo sound for the first time! I would suggest going through the big collection of presets and modifying one of them that is close to what you’re looking for.

I seemed to gravitate towards the Rhythm Step panning modes where you can designate multiple “hard” pan positions (up to five positions) that change in locked session tempo fashion. Leave it to SoundToys to also provide controls called Feel and Rhythm to further sync the panning action to the feel of the music. Borrowed from SoundToys’ Tremolator and FilterFreak is the Custom Rhythm Editor–actually two editors for two different panning approaches–break point editors for designing complex modulation waveforms. These are brilliant features!

I also liked using the LFO-based panners for more dreamy-sounding treatments. You have complete control over the LFO’s speed or rate and the direction of the pan movement: Left-to-Right, Back-and-Forth, and Right-to-Left. I used one of the wider panners for a reverb return I mixed with another instantiation of the same reverb patch. This animated the reverb “cake” I was cooking up for a big vocal harmony stack. The Tweak button opens a whole LFO dynamics GUI for setting up modulation of the rate, changing the pan offset (shifts the left and right panorama itself anywhere–leaning to the left or right), defining the panning width (Width Mod) and panning rate (Rate Mod) depending on the level. The Threshold, Attack, and Release knobs control the envelope detector that determines dynamics modulation.

I did find the triggered panning very accurate and foolproof for causing a track to reposition itself predicated on it exceeding a certain level as set with the Threshold control. I also like the Width control for setting how far or wide to the left and right a track pans–all the way beyond 180 degrees (hard left and right) to 210 degrees or outside of the speakers.

Auto panning has the potential to be a distraction for the listener and the Smoothing control will set the transition from position to position anywhere from an instant and super hard “snap” to much slower, lazier or liquid movement.

An unexpected feature in PanMan are the different Analog modes where you can change from the clean digital operating mode to any of seven different analog distortion characteristics whose amount is controlled by the Input and Output I/O knobs. Dirty up any panned track using: Clean, Fat, Squash, Dirt, Crunch, Shred, or the ridiculously sounding Pump characteristic models. These sound like they may have been borrowed from SoundToys’ FilterFreak and other SoundToys plug-ins.

As with most of the SoundToys plug-ins, the programming detail and feature sets go on and on and PanMan is no different in that regard. But I’m a beginner and I have had no problems getting beautifully ornate panning treatments very quickly. This is a sound designer’s dream tool that pays off more and more as I learn more about the internal tweak controls. Like Decapitator, PanMan is a big winner for me here at my Tones 4 $ Studios!!

There are demo versions posted at www.soundtoys.com. It sells as a single plug-in for $349 in TDM and $179 Native. The SoundToys TDM Effects Version 4 bundle sells for $1,195 and includes eleven plug-ins. Both Decapitator and PanMan are exclusive to V4 along with a new preset management system, and many new presets. The Version 4 upgrades cost $99 for Native and $199 for TDM. Check: www.soundtoys.com for more information.

Barry has teamed up with For The Record to share his reviews with the latest in recording products. Barry is a recording engineer/producer and contributing editor for MIX Magazine, ‘New Toys’ columnist for L.A.’s Music Connection Magazine, and writer for www.prosoundweb.com. He also is editor/writer of Gear Lust, his online special review section at www.barryrudolph.com

I installed the 2009 version of Smith Micro’s Stuffit Utility into my G5 MAC and discovered Drop Stuff, the whole compression side of the seemingly lowly free utility we all used called Stuffit Expander. Drop Stuff is better than ever with a new interface and built-in AES 256-bit encryption.

First of all with Drop Stuff, with its patented 24-bit image compression, has TIFF, PNG, GIF, and BMP compressors and you can compress files by to 98% of their original size (depending what they are). Squash and optimize MP3s, PDFs and images to save hard drive space and time when sending them over the Internet. Even JPEG photo files (an already compressed format) can be reduced up to a further 30%. Drop Stuff creates Stuffit, Zip and TAR archives–you just drop your files and folders on the appropriate icon on the super simple GUI. I liked the Stuff & Burn mode where it stuffs and sends the file to the MAC’s CD/DVD burner in one operation. Sweet!Smith Micro Stuffit Deluxe 2009

Expander now expands 7-Zip archives and segmented Zip archives along with files using any of 30 different compression formats–even encrypted Zip archives. I like browsing my archive of files without waiting for expansion using the Stuffit Archive Manager. You can preview thumbnails, add, delete and change files and save searches with Stuffit Collections.

Other cool features you get are: upload directly to FTP, MobileMe, iDisk or multiple CDs or DVD-ROMS, and restore files to original locations Stuffit is Finder-aware so you can preview compressed archives inside MAC’s TimeMachine.Smith Micro Stuffit Deluxe 2009

Using Stuffit Deluxe 2009 for MACs is like doubling the size of your hard drive for storing pictures and music. You can put off buying another drive and the work transferring files by buying it for $79.99 as a download from: my.smithmicro.com/mac/stuffit/index.html

Barry has teamed up with For The Record to share his reviews with the latest in recording products. Barry is a recording engineer/producer and contributing editor for MIX Magazine, ‘New Toys’ columnist for L.A.’s Music Connection Magazine, and writer for www.prosoundweb.com. He also is editor/writer of Gear Lust, his online special review section at www.barryrudolph.com

The two-rack space Crane Song Egret is an eight-channel summing/mixer specifically designed for both straight ahead DAW mixing and composite mixing where both virtual instrument or other audio sources are mixed together with DAW audio tracks. To accomplish this, there is a lot of impeccably built technology packed behind the beak of this bird!

The ultimate aim for an audio equipment designer is purity of sound and to that end Egret works transparently–a pure system that adds no gain or ‘coloration’ to the overall sound. However to satisfy music producers/mixers who depend on their equipment for a certain “je ne sais quoi” quality, Egret also has a Color control knob for each of the eight inputs. It adds (or subtracts–depending on your perception) a certain analog softness to edgy audio sources.

Read Barry’s Mix Magazine Feature Article Called “Strictly Summing.”

Egret uses eight D/A converters just like those used in Crane Song’s Avocet mastering monitor controller. Supporting rates up to 192kHz, a Cirrus Logic 4398 D/A chip is used along with an 8421 SRC chip (sample rate converter used for input jitter reduction) surrounded by Analog Devices OP275 amplifiers for interfacing to the unit’s discrete Class-A summing and mixing bus circuitry.

There is a front panel switch to disable the SRC for cases where lower latency is required and the Source switch chooses the unit’s digital source between three inputs: AES/EBU (4) XLRS, ADAT Lightpipe, and a third ‘yet to be determined’. Currently the converters and the interface supports AES single wire to 192KHz, ADAT, and S/MUX to 96kHz and can be upgraded as the technology changes. The converters will also independently operate even at different sample rates if required.

Features And Front Panel

Each channel of Egret has a level control, a cue send, and pan control. Each channel also has an analog/digital source button where either the output of the eight-channel analog-to-digital converter or an alternate (eight rear panel TRS jacks) analog balanced line input can be selected. The alternate Analog Inputs could be used for virtual instruments running along with the mix or live sound sources such as in a DJ or FOH mixing application. You could also use them as returns from external processing gear.

To add external processing to any channel in Egret you would send to outboard gear from the direct out (eight rear panel XLRs) and return its output to the analog input. By switching between the digital (actually the output of the D/A converter) and Analog In you could A/B the inserted processing.

There are both solo-in-place and mute buttons on each channel’s line up and a built in Aux send bus with Master level control that works for either a cue system or as an effect send. The headphone monitor jack’s output follows the stereo bus output for a monitor mix when Egret is being used in multi-channel location recording.

Also borrowed from the Avocet’s design is the master bus level control. It’s a Grayhill rotary shaft encoder that drives a microprocessor-controlled bank of relays for super-accurate and repeatable 1dB stepped attenuation. An absolute necessity for recalling mixes, the stereo gain matching is better than 0.05dB.

Egret is built so that the stereo, and cue buses can be chained together to create a many input system. With a special cable, Egret’Äôs bus can be tied to a Crane Song Spider to sum additional analog inputs for complete DAW recording and mixing/interface system.

The Egret Flies

My first test was to reassign the outputs of an “in the box” Pro Tools mix I had already done. I reassigned it into four stereo stems. I wanted to keep my mix the same and compare my stereo mix with the Egret’s analog sum of the stems. I configured Pro Tools’ I/O to send ADAT Lightpipe digital audio out the 9 through 16 ADAT spigot of my Digidesign HD192 interface unit. I set up drums and bass to outputs 9-10, guitars to 11-12, keyboards to 13-14, and vocals plus all effect returns on 15-16. All four Pro Tools stereo master output faders were at 0dB positions (unity).

I ran all eight Egret channel level controls at full CW, appropriately pan odd/even channels let and right, and the Master level at one LED dot below 10. Again like my Avocet volume control knob there are green LEDs ringing the stereo level control to show levels in 1dB steps.

The stereo LED meter on the Egret shows peaks levels at about 2/3 of full scale–obviously Egret has tremendous dynamic range with substantial headroom to spare. I connected my Benchmark Media ADC-1 to convert the Egret mix to digital and sent an AES/EBU signal back to a new stereo mix track in Pro Tools via the AES Enclosure input. Also everything was clocked from the ADC-1.

Since I wanted to check for any differences between my ITB mix summed inside of PT with the Egret’s analog summing, I had to place the same stereo plug-in processing chain on the Egret summed mix back in PT.

The result was both mixes matched closer than I would ever imagine. So does this prove anything? Considering I’m doing two extra conversions: the D/A in the Egret and then the A/D in the Benchmark and applying the same stereo processing, I was surprise that the Egret was this transparent and that the eight channel inputs tracked each stem’s level so exactly. It is a testament to the quality and design of Egret, the quality of the converters used and lastly the accuracy of Pro Tools HD Accel.

So why go through this setup if it ends up sounding about the same? The answer is that you gain more mix control valuable when mastering or supplying stemmed mixes in post-production jobs.

Separate processing of mix stems goes back to George Martin and the Beatles when he would mix their mono singles to a ‘twin track’ (2-track) tape deck with vocals on one channel and the track on the other. In mastering he would compress and EQ the vocals and track differently and recombine them for maximum punch and loudness.

I Go Deeper

So my next test was to apply the same stereo bus processing I put on the entire stereo mix separately to each of the four stems. For this song I had: WAVES’ SSL Stereo Bus compressor followed by the Sonnox Stereo Limiter and followed that with Sonalksis’ SV-517 Stereo EQ. Of course in a big and powerful Pro Tools rig (like mine) this is all easy to do–no need to buy three more hardware stereo EQs, limiters, and compressors you’d need if we were working in Abbey Road studios circa 1965!

I put those plugs all set the same across each of the four stereo stem masters. Immediately the Egret’s stereo master had to come down 5dB with the increased average level jump of each of the stems. The mix was all wrong necessitating new vocal rides, drum sound changes and everything else.

For this to work I would have to start a new mix using this stem configuration. After a little work starting a new mix, I could hear that the vocals took on more clarity especially after readjusting EQ and compression and doing new gain rides. I tried compressing the drums and bass more without affecting the rest of the song’s instruments and vocals. Since my stem masters in PT are automatable, there are loads of creative opportunities with regard to remixing tricks and general mayhem.

I also had a chance to see what the Egret’s Color controls did. It is a very subtle effect most noticeable on electric guitars. It mellows out any abrasiveness in the sound without a big shift in loudness. Applied to all the stems, it is another sonic choice you cannot get in any other way I know of.

I’ll Take Four Please!

So my only wish is for at least four Egrets interconnected for 32 mix channels. I’d set them all the same at unity and all odd/even, left right for standardized recall. Like my Crane Song Avocet and Phoenix TDM plug-ins, the Egret is a big winner for me. All pro all the way, it is one of the most flexible, great-sounding summing/mixing systems I’ve used so far’Äîand I’ve tried a lot of them! It sells for $5,600 and for much more go to: www.cranesong.com/downloads/egret%20data.pdf

Recording engineer/producer Barry Rudolph is a contributing editor for MIX Magazine, ‘New Toys’ columnist for L.A.’s Music Connection Magazine, writer for www.prosoundweb.com. He also is editor/writer of Gear Lust, his online special review section at www.barryrudolph.com. Barry has teamed up with For The Record to share his reviews with the latest in recording products.

You can check out Barry’s past articles, reviews and commentaries printed in these journals as well as many other magazines at:

https://www.barryrudolph.com/pages/magazinesdirectory.html
SPL aka Sound Performance Labs is an old hand at level-independent dynamic processing with the invention of the Transient Designer and the Transient Designer plug-in, two of their best products. But the new DrumXchanger drum replacement plug-in might eclipse that triumph. DrumXchanger will replace drum sounds in multi- track sessions no matter the level changes and track dynamics. All drum hits are tracked and replaced including ghost notes, fast fills and rolls. It will do this in real time and in sample phase-accuracy with the original signal.

DrumXchanger comes with a collection of SPL’s high quality 24-bit/96 kHz multi-samples. The library was recorded using SPL preamps and processors and includes three drum kits with one snare, one bass drum and four toms each. Every multi-sample is made up of up to 80 sounds in sixteen dynamic levels and five variations. DrumXchanger will also use .wav sample files as well.

DrumXchanger comes as Native only in RTAS, VST and AU versions for Macs and PCs and features two Transient Designers to process both the original sound as well as the replacement drum sample.

I installed DrumXchanger in my Pro Tools HD 3 Accel rig and was presented with a large GUI that allows for the very precise programming, processing and detection of the original sound for the generation of a triggering signal. Besides the capability of tuning the sample file +/-1 octave in real-time, you can change the phase of the drum sample in relation to the original sound; and externally trigger the sample from an external source via the sidechain input. (DAW program permitting).

SPL DrumXchanger
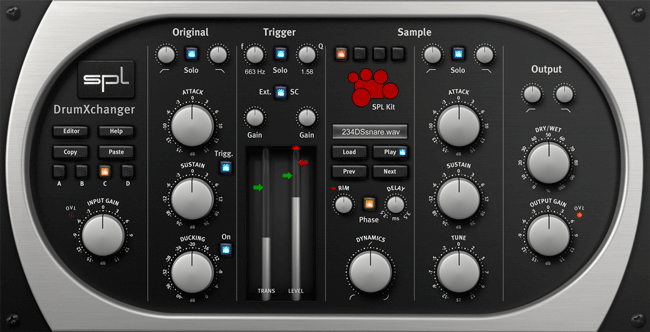
To Explain The Processes And Features Of DrumXchanger Completely, 
Here Are Descriptions Of The Plug-In’s Five Sections As Controlled By Its Excellent GUI.


Section 1–Input

There are four automatable and switchable plug-in setups: A, B, C, and D. These are convenient ways to store complete sets of plug-ins settings and switch between them on the fly. Great for tracking drum performances with very wide dynamics or changes in stick techniques, you can copy and paste your best working setup from one to another and tweak the copy for a special triggering or changing samples as required for certain song sections.

This section has an Input Gain range of +/-15dB for the original drum sound that does not change the triggering level setting. You can tailor the original sound using the high (20Hz to 11kHz) and low pass (20Hz to 20kHz) 12dB/octave filters. The Solo button quickly checks the sound quality of the original.

Section 2–Transient Designer And Ducker

Next comes Transient Designer #1 (of 2) to modify the original drum sound. Just like SPL’s original TD hardware unit and their plug-in, you can alter the attack portion of a percussive sound by +/- 15dB and sustain or ring out portion by +/- 24dB.

A Ducking feature with a range of 0db to -40dB is added here that adjusts the level drop of the original drum sound during the time the sample plays. Ducking sounds like a big compressor squashing down the original sound only momentarily. Pushing the Trigg button “copies” the TD processing to the trigger signal sidechain as well as the original. Reducing the sustain portion (that contains leakage etc.) of the original sound with TD will make for a better triggering action of the sample.

Section 3–Trigger

The Trigger section uses a bandpass filter to precondition the trigger signal. This is a full-range filter starting at 20Hz and going to 20kHz. It has an extreme range of Q values– 0.05 to 50! A Solo button lets you hear the effect of the filter and tuned it to (typically) the basic center and predominate frequencies of most of the energy of the original drum’s sound. Adjusting the Q will refine immensely the trigger performance both in accuracy and speed!

After filtering you may need to readjust the Trigger Gain from 0 to +48dB for proper detection. It is recommended to set the Trigger Gain high enough so the loudest drum hits make the Level meters hit the max peak LED (red light flashing). This guarantees that the loudest sample (of multi-samples) is being played.

The Rim control red arrow ranges from 0-100% and adjusts the level for the individual rim sounds for the included SPL multi-samples of snare and tom sounds. This is to set the desired difference of the rim sounds in relation to the regular drum hits. There is also a Rim knob control to set the input level of all rim samples available in the SPL drum kits.

There are two threshold adjustments in DrumXchanger with two LED peak reading meters. There are two green arrows to adjust triggering threshold–they slide up and down adjacent to these meters. In the default advanced triggering mode, both green arrows’ threshold settings have to be reached for DrumXchanger to play a sample. The green arrows (handles) should be set low enough to ensure triggering but not too low to produce false hits on leakage or crosstalk.

The Ext. SC button activates the side-chain for external trigger such as a recorded drumhead trigger microphone track.

Section 4–Sample

The Sample Section has two parts: sample selection and sample processing. Living up to its name, DrumXchanger’s method of sample selection is one of its best features. The loading, auditioning and playing of any sample from any drive in your system is elegantly handled in this plug-in.

Clicking the Load button allows navigation to the folder where your drum sample .wav files or the .splx files in the SPL Kit folder exists. You virtually load the entire contents of the folder once you navigate to it. For easiest access, I’ve gotten into the habit of copy all my possible drum replacement sample candidates into a “samples” folder and placing it inside each song session folder on my Pro Tools work drive.

I say ‘virtually’ because you are able to step through the list of samples in your folder, using the Next and/or Prev(ious) buttons, and audition each sample using the Play button for when the song is stopped or hear them automatically triggered when the song is playing. This is an incredible feature!

If you select a SPL Kit by clicking on the drumkit icon in the GUI, you get an entire kit of kicks, snares, and toms ready to go–just select the individual drum on the icon and get it now. At some point it would be good if SPL releases a software utility to build your own SPL kits using any samples you like.

All the SPL drum kits offer individual rim sounds for snare drums and toms to be mixed with the sample sounds, and the SPL kit sounds offer 16 velocity levels recorded in 5 variations, summing up to 80 individual hits per drum sound!

The Sample selection section also has a Phase reverse button for flipping the sample’s polarity 180 degrees if you hear cancellation problems. A Delay control adjusts the samples time up to +/- 3.5ms if you perceive double hits on fast rolls and fills.

Lastly, the Dynamics control lets you determine whether DrumXchanger follows the original drum’s dynamics or not–or any amount between these two extremes. You can go from exactly following dynamically and triggering on every ghost note precisely or have the new sample fire the same loudness every time.

Sample Section Processing

The other half of the Sample section processes only the sample(s) you are firing. There are the same high and low pass filters and a Solo button to listen only to the sample. Transient Designer #2 processes the sample and there is +/- 1-octave sample pitch adjustment knob located here.

Section 5–Output

For processing the finished sound–the mix of original drum sound and added sample is the job of the Output section. Again there are the high and low pass filters and the section finishes with a Dry/Wet knob, Output level control and Overload LED.

In the Studio

When mixing Pop Rock and R&B songs here at my Tones 4 $ Studios, I’m often asked to replace or augment the recorded kick and snare sounds. I usually use Digidesign’s DrumReplacer or Drumagog. But not any more!

Invariably when the producer and/or artist come in to take a listen to my mix, they like what I’ve done but want to explore and add some other kick and snare sounds to what I’ve done. I’ve had as many as six different snare samples mixed with the original live kit–don’t ask me why.

With DrumReplacer or Drumagog, I would always record the sample and tweak individual hits here and there because they are late or flam or just be missing in action–not triggered at all. I still like to record my new samples with DrumXchanger but it is a luxury knowing I can recall it and fire a different or an additional sample.

The producers I work with love the auditioning ability of DrumXchanger. Being able to hear any sample fire while the rest of the track plays is awesome. We also like having the Transient Designer and the tuner for exactly dialing in the sample–sometimes that is all that is needed to “marry” a new kick drum sample to the rest of the kit.

On a Rock song with a very ambient drum kit sound–lots of leakage on all the close mics–I wanted to add another snare sample to the piccolo snare. The close snare mic track was full of hi-hat spill and kick drum leakage plus the drummer played a lot of ghost notes and a few fast rolls.

First thing was to slightly filter the snare track using the high/low pass filter in the Input section and then adding a little more attack using the Transient Designer. Reducing the sustain with TD helps tremendously with the hi-hat spill and kick drum leakage but I wish there was a way to use the TD only for the trigger signal.

I used the Trigger section’s bandpass filter to “tuned” to the snare drum’s “box” sound at 874Hz with a Q of 7.74. This killed most of the high and low frequencies so now the kick and hi-hat leakage was nearly gone from the trigger signal.

I chose a Ludwig Black Beauty sample from a folder of snare samples and getting DrumXchanger to follow the original snare drum track on two and four was no problem. By looping song sections, where the drummer played a couple of fills and ghosts, I adjusted the green arrow threshold handles and the threshold controls themselves until DrumXchanger followed all hits perfectly. Since I was going to mix the original with the new sample, if the very first attack of a fast roll doesn’t trigger, it was not the end of the world. I did manage to tweak until even the quieter first strikes fired the sample.

Once I was satisfied with the general operation of the triggering, I copied this setup from A over to B and readjusted B for the touchy areas where I needed more trigger sensitive and/or a lower threshold. These lower settings wouldn’t fly for most of the song without occasional false triggering.

Since you can automate changing from Setup A to B, I went down the song and changed to Setup B for those touchy moments. I was now finished.

When the producer arrived, he didn’t like the sample I used but, since I had already done the work of programming the triggering etc., I just stepped through my snare drum collection until he heard one that worked for him. I adjusted the mix with the Wet/Dry control and moved on with the rest of the mix.

DrumXchanger is now a mainstay in all my mixes! For the first time I am satisfied with the whole drum replacement process! Something I’ve always thought to be extra-tweaky work for usually dubious results and sometimes, uncertain worth. I big, big thumbs up for DrumXchanger! It sells for $449 USD (299 EUR) and for more information visit www.spl.info.