The Record Shop Nashville is honored to be mentioned in the latest issue of Mix Magazine, which features many our recent studio sessions! Read what they had to say here!
The Record Shop Nashville is honored to be mentioned in the latest issue of Mix Magazine, which features many our recent studio sessions! Read what they had to say here!

Welcome back to behind the gear at The Record Shop. Are you ready to roocccck!?!?!? (cue stadium of screaming fans) This week we take a look at the Purple Audio MC77. The MC77 is a superior recreation of the legendary URIE 1176 Peak Limiter. This piece of gear bleeds rock and roll. If it was magically transformed into a person it would make Slash look like Yanni. From Drums to guitars to vocals, this thing will give you clarity, punch, and attitude for days. Let’s start by giving you a quick back story on the MC77’s estranged father, the URIE 1176.
The 1176 was designed by audio legend, Bill Putnum in 1967. Bill was a revolutionary in the audio world. He is noted to have been the first cat to use artificial reverb, double a vocal recording, and develop a multi-band equalizer. So it is no surprise that he was also the dude that created what is arguably the most commonly used limiter in modern recording. The 1176 became the first true peak limiter with solid state circuitry. It was popular for its super fast attack time, resulting in a signature tone that can be heard on countless records.
In 1997, a new audio company called Purple Audio released their first product, the MC76 (If you paid attention in roman numeral class you’ll get it). Designed by Andrew Roberts, the MC76 looked like an 1176 that Barney got a hold of in the restroom, and it sounded like one that hung out with Jose Canseco (if your not hip to baseball or the news, he did a lot of steroids). It had all the vibe of a vintage 1176 without the price tag, and it quickly became a highly sought after piece of gear. The MC77 is an update of the original with a few extra features.
Aside from the paint job, the MC77 really stands out in the crowd. It has the sonic characteristics of the classic, vintage 1176 with an improved high frequency response and added grit. We’ve used it on just about everything when we are looking for something to give a track some attitude. If we want to add some punch to drums, smooth out guitars, round out a bass, or put some rock in a vocal, the MC77 delivers every time.
We have one trick in particular that produces some really unique results. But in order to explain clearly, let’s start with a story. At some point back in the day, there was an audio engineer who spent way to much time playing with the gear in the studio. One day he said, “Hey, I wonder what would happen if I pressed down all of the ratio buttons on this limiter at the same time?” Once he had all four of the ratio buttons locked in place, he cranked the input and the rest is history. There are a few different names for this trick; all buttons in, nuke, British mode; but the result is a super compression that has been used to create some really unique sounds. I’m a big fan of smashing the drum room mics with this setting. The setting creates a lag in the attack time, resulting in extra punch, and a drastic compression slope, resulting in a quick drop in level. As this push and pull repeats with each transient hit we can achieve a rhythmic pumping of compression that breathes with the track and amplifies the “room sound”. Listen to any modern rock record and your bound to find this effect in play.
And that concludes this evenings presentation. Check back next week for our next installment of “Behind The Gear at The Record Shop”, where we take a look at another colorful device, the CL1B tube compressor. In the meantime, feel free to drop by our Gear Page for more information on our vast array of equipment.
As always, we love to hear feedback on our articles. If this was helpful, or a complete waste of your time, let us know! We love making new friends as well. Feel free to drop by our page on Facebook and sign up for our monthly newsletter to receive valuable resources and updates on the studio. Thanks for dropping by For The Record. Catch you next week!
-Giovanni
Therecordshopnashville.com

If I was stuck in a studio on a desert island, and could only choose one compressor to bring with me, I’d grab a Distressor. The Distressor is without question the most verstile compressor on the market. If you walk into any professional recording studio in Nashville, or around the world, you’re bound to find at least one of these pieces in the room. If you drop by The Record Shop, you’ll find four of them. Why, you might ask? One, because its a bad mama jama. Two, because it adds a classic sound to digital recordings. Three, because we work on such a wide range of projects, we are often going after a different “sonic vibe” from song to song. The Distressor gives us the ability to shape the sound to fit the song. In this segment of “Behind The Gear” we’ll discuss how we utilize the Distressor here at The Record Shop, and offer some tips for using it on your own. So where did this magical piece of studio gold come from? Read on…..
Empirican History EL8X
The Distressor was developed in 1995 by Dave Derr. Dave started Empirical Labs as a recording studio and electronics consulting firm. He was also part of the design team at Eventide that created the H3000, a legendary effects processor. It’s clear that this experience played a big role in the innovation of functions on the Distressor. Simply put, Dave took the best features from a number of classic studio compressors, added modern functionality, and ease of use, while maintaing a “vintage” tone. As The Empirical Labs motto says, “We want to make products that work a little easier, a little better, and a lot longer – and make sure they are fun to use.” I think they’ve hit their mark.
-If you are interested in learning about the history of the Distressor and Empirical labs, check out this article at Mercenary Audio. The guys have a great story about how they helped Dave name the Distressor-
Vintage Features
Back in 1997, Mix columnist Paul White said this about the Distressor, “If you’re one of those people who believe only tube technology can deliver the true classic sound, a few minutes spent using the Distressor might cause you to re-think your position.” While digital recording technology continues to improve, we still turn to analog gear for its “musical response” and “warmth.” Usually, the word “warmth” refers result of tube saturation that creates a round, full sound. However, in the case of The Distressor, warmth is more like an adjective. Here are some of the features that make the Distressor so unique.
–Distortion Modes
The Distressor has two distortion modes that emit a warm, harmonic distortion to the audio signal. The Dist 2 mode enhances the second harmonics, similiar to the saturation of a Class A Tube. The Dist 3 mode features a third harmonic that has the qualities of a Class B tube, or analog tape machine. We often use the Distressor for these modes alone. By setting the ratio to 1:1, you can process the sound using these settings without compressing the signal.
-Detector Modes
The Distressor also features two audio modes that vary the response of the device. The first detector mode is the High Pass Filter mode (HP). In the HP mode the Distressor does not react to low frequency energy in the sound source. This keeps the Distressor from reacting irrationally to a sudden rise in low end, such as a “b” or “p” sound from a vocalist. The second detector mode, called the “band emphasis” mode, makes the compressor react more drastically to harsh sounds in the high-mid frequency range. This mode can be useful on a vocalist that has a piercing tone to their voice on high notes, or to offer an smooth “analog” texture to an instrument.
Settings
Another unique design feature of the Distressor is the Ratios and Curves. Compressors generally have seperate threashold and ratio controls. The threashold sets the volume level at which the compressor starts to work, while the ratio determines how drastically it reacts. In the case of the Distressor, the threshold has been strategically determined within the ratio that is selected. The Distressor has eight ratio options to choose from. Each setting provides a unique response to the signal, exhibiting a musically pleasing effect on everything from subtle compression to dynamic destruction.
How We Use It
At The Record Shop, we use our Distressors mainly on Vocals, Drums, Guitars, and anything that calls for a “classic” or “gritty” vibe. We love the “Nuke” mode, a setting that makes the distressor act as a “brick wall” limiter, with a unique release slope. This setting is great for big room sounds. We also make use of an option called “Brit Mode” that simulates the effect of the classic 1176 Limiter set to “all buttons in.” (a setting that became popular in 70’s for aggressive drum compression.) The Distortion modes are an invaluable assest to the Distressor and can be heard on nearly every recording that comes out of The Record Shop. The most useful feature of the Distressor is its overall tonal cahrecteristics. It is a great option for anything that needs to be smoothed out, warmed up, or given some edge. If you would like to hear more examples of how we utilize the Distressor, leave us a comment and we’ll send you our favorite settings.
Check back next week for our next installment of “Behind The Gear at The Record Shop”, highlighting the legendary 1176 Limiter. In the meantime, feel free to drop by our Gear Page for more information on our vast array of equipment.
As always, we love to hear feedback on our articles. If this was helpful, or a complete waste of your time, let us know! We love making new friends as well. Feel free to drop by our page on Facebook and sign up for our monthly newsletter to receive valuable resources and updates on the studio. Thanks for dropping by For The Record. Catch you next week!
-Giovanni
Therecordshopnashville.com
Recording engineer/producer Barry Rudolph is a contributing editor for MIX Magazine, ‘New Toys’ columnist for L.A.’s Music Connection Magazine, writer for www.prosoundweb.com. He also is editor/writer of Gear Lust, his online special review section at www.barryrudolph.com. Barry has teamed up with For The Record to share his reviews with the latest in recording products.
You can check out Barry’s past articles, reviews and commentaries printed in these journals as well as many other magazines at:
https://www.barryrudolph.com/pages/magazinesdirectory.html
SPL aka Sound Performance Labs is an old hand at level-independent dynamic processing with the invention of the Transient Designer and the Transient Designer plug-in, two of their best products. But the new DrumXchanger drum replacement plug-in might eclipse that triumph. DrumXchanger will replace drum sounds in multi- track sessions no matter the level changes and track dynamics. All drum hits are tracked and replaced including ghost notes, fast fills and rolls. It will do this in real time and in sample phase-accuracy with the original signal.
DrumXchanger comes with a collection of SPL’s high quality 24-bit/96 kHz multi-samples. The library was recorded using SPL preamps and processors and includes three drum kits with one snare, one bass drum and four toms each. Every multi-sample is made up of up to 80 sounds in sixteen dynamic levels and five variations. DrumXchanger will also use .wav sample files as well.
DrumXchanger comes as Native only in RTAS, VST and AU versions for Macs and PCs and features two Transient Designers to process both the original sound as well as the replacement drum sample.
I installed DrumXchanger in my Pro Tools HD 3 Accel rig and was presented with a large GUI that allows for the very precise programming, processing and detection of the original sound for the generation of a triggering signal. Besides the capability of tuning the sample file +/-1 octave in real-time, you can change the phase of the drum sample in relation to the original sound; and externally trigger the sample from an external source via the sidechain input. (DAW program permitting).
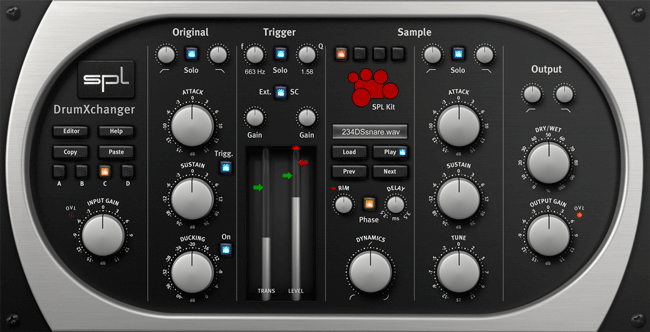 |
| To Explain The Processes And Features Of DrumXchanger Completely, Here Are Descriptions Of The Plug-In’s Five Sections As Controlled By Its Excellent GUI. |
Section 1–Input
There are four automatable and switchable plug-in setups: A, B, C, and D. These are convenient ways to store complete sets of plug-ins settings and switch between them on the fly. Great for tracking drum performances with very wide dynamics or changes in stick techniques, you can copy and paste your best working setup from one to another and tweak the copy for a special triggering or changing samples as required for certain song sections.
This section has an Input Gain range of +/-15dB for the original drum sound that does not change the triggering level setting. You can tailor the original sound using the high (20Hz to 11kHz) and low pass (20Hz to 20kHz) 12dB/octave filters. The Solo button quickly checks the sound quality of the original.
Section 2–Transient Designer And Ducker
Next comes Transient Designer #1 (of 2) to modify the original drum sound. Just like SPL’s original TD hardware unit and their plug-in, you can alter the attack portion of a percussive sound by +/- 15dB and sustain or ring out portion by +/- 24dB.
A Ducking feature with a range of 0db to -40dB is added here that adjusts the level drop of the original drum sound during the time the sample plays. Ducking sounds like a big compressor squashing down the original sound only momentarily. Pushing the Trigg button “copies” the TD processing to the trigger signal sidechain as well as the original. Reducing the sustain portion (that contains leakage etc.) of the original sound with TD will make for a better triggering action of the sample.
Section 3–Trigger
The Trigger section uses a bandpass filter to precondition the trigger signal. This is a full-range filter starting at 20Hz and going to 20kHz. It has an extreme range of Q values– 0.05 to 50! A Solo button lets you hear the effect of the filter and tuned it to (typically) the basic center and predominate frequencies of most of the energy of the original drum’s sound. Adjusting the Q will refine immensely the trigger performance both in accuracy and speed!
After filtering you may need to readjust the Trigger Gain from 0 to +48dB for proper detection. It is recommended to set the Trigger Gain high enough so the loudest drum hits make the Level meters hit the max peak LED (red light flashing). This guarantees that the loudest sample (of multi-samples) is being played.
The Rim control red arrow ranges from 0-100% and adjusts the level for the individual rim sounds for the included SPL multi-samples of snare and tom sounds. This is to set the desired difference of the rim sounds in relation to the regular drum hits. There is also a Rim knob control to set the input level of all rim samples available in the SPL drum kits.
There are two threshold adjustments in DrumXchanger with two LED peak reading meters. There are two green arrows to adjust triggering threshold–they slide up and down adjacent to these meters. In the default advanced triggering mode, both green arrows’ threshold settings have to be reached for DrumXchanger to play a sample. The green arrows (handles) should be set low enough to ensure triggering but not too low to produce false hits on leakage or crosstalk.
The Ext. SC button activates the side-chain for external trigger such as a recorded drumhead trigger microphone track.
Section 4–Sample
The Sample Section has two parts: sample selection and sample processing. Living up to its name, DrumXchanger’s method of sample selection is one of its best features. The loading, auditioning and playing of any sample from any drive in your system is elegantly handled in this plug-in.
Clicking the Load button allows navigation to the folder where your drum sample .wav files or the .splx files in the SPL Kit folder exists. You virtually load the entire contents of the folder once you navigate to it. For easiest access, I’ve gotten into the habit of copy all my possible drum replacement sample candidates into a “samples” folder and placing it inside each song session folder on my Pro Tools work drive.
I say ‘virtually’ because you are able to step through the list of samples in your folder, using the Next and/or Prev(ious) buttons, and audition each sample using the Play button for when the song is stopped or hear them automatically triggered when the song is playing. This is an incredible feature!
If you select a SPL Kit by clicking on the drumkit icon in the GUI, you get an entire kit of kicks, snares, and toms ready to go–just select the individual drum on the icon and get it now. At some point it would be good if SPL releases a software utility to build your own SPL kits using any samples you like.
All the SPL drum kits offer individual rim sounds for snare drums and toms to be mixed with the sample sounds, and the SPL kit sounds offer 16 velocity levels recorded in 5 variations, summing up to 80 individual hits per drum sound!
The Sample selection section also has a Phase reverse button for flipping the sample’s polarity 180 degrees if you hear cancellation problems. A Delay control adjusts the samples time up to +/- 3.5ms if you perceive double hits on fast rolls and fills.
Lastly, the Dynamics control lets you determine whether DrumXchanger follows the original drum’s dynamics or not–or any amount between these two extremes. You can go from exactly following dynamically and triggering on every ghost note precisely or have the new sample fire the same loudness every time.
Sample Section Processing
The other half of the Sample section processes only the sample(s) you are firing. There are the same high and low pass filters and a Solo button to listen only to the sample. Transient Designer #2 processes the sample and there is +/- 1-octave sample pitch adjustment knob located here.
Section 5–Output
For processing the finished sound–the mix of original drum sound and added sample is the job of the Output section. Again there are the high and low pass filters and the section finishes with a Dry/Wet knob, Output level control and Overload LED.
In the Studio
When mixing Pop Rock and R&B songs here at my Tones 4 $ Studios, I’m often asked to replace or augment the recorded kick and snare sounds. I usually use Digidesign’s DrumReplacer or Drumagog. But not any more!
Invariably when the producer and/or artist come in to take a listen to my mix, they like what I’ve done but want to explore and add some other kick and snare sounds to what I’ve done. I’ve had as many as six different snare samples mixed with the original live kit–don’t ask me why.
With DrumReplacer or Drumagog, I would always record the sample and tweak individual hits here and there because they are late or flam or just be missing in action–not triggered at all. I still like to record my new samples with DrumXchanger but it is a luxury knowing I can recall it and fire a different or an additional sample.
The producers I work with love the auditioning ability of DrumXchanger. Being able to hear any sample fire while the rest of the track plays is awesome. We also like having the Transient Designer and the tuner for exactly dialing in the sample–sometimes that is all that is needed to “marry” a new kick drum sample to the rest of the kit.
On a Rock song with a very ambient drum kit sound–lots of leakage on all the close mics–I wanted to add another snare sample to the piccolo snare. The close snare mic track was full of hi-hat spill and kick drum leakage plus the drummer played a lot of ghost notes and a few fast rolls.
First thing was to slightly filter the snare track using the high/low pass filter in the Input section and then adding a little more attack using the Transient Designer. Reducing the sustain with TD helps tremendously with the hi-hat spill and kick drum leakage but I wish there was a way to use the TD only for the trigger signal.
I used the Trigger section’s bandpass filter to “tuned” to the snare drum’s “box” sound at 874Hz with a Q of 7.74. This killed most of the high and low frequencies so now the kick and hi-hat leakage was nearly gone from the trigger signal.
I chose a Ludwig Black Beauty sample from a folder of snare samples and getting DrumXchanger to follow the original snare drum track on two and four was no problem. By looping song sections, where the drummer played a couple of fills and ghosts, I adjusted the green arrow threshold handles and the threshold controls themselves until DrumXchanger followed all hits perfectly. Since I was going to mix the original with the new sample, if the very first attack of a fast roll doesn’t trigger, it was not the end of the world. I did manage to tweak until even the quieter first strikes fired the sample.
Once I was satisfied with the general operation of the triggering, I copied this setup from A over to B and readjusted B for the touchy areas where I needed more trigger sensitive and/or a lower threshold. These lower settings wouldn’t fly for most of the song without occasional false triggering.
Since you can automate changing from Setup A to B, I went down the song and changed to Setup B for those touchy moments. I was now finished.
When the producer arrived, he didn’t like the sample I used but, since I had already done the work of programming the triggering etc., I just stepped through my snare drum collection until he heard one that worked for him. I adjusted the mix with the Wet/Dry control and moved on with the rest of the mix.
DrumXchanger is now a mainstay in all my mixes! For the first time I am satisfied with the whole drum replacement process! Something I’ve always thought to be extra-tweaky work for usually dubious results and sometimes, uncertain worth. I big, big thumbs up for DrumXchanger! It sells for $449 USD (299 EUR) and for more information visit www.spl.info.